Wednesday, August 31, 2011

A Peek at Friday's Class!


This Friday we'll be making some cool stuff! At class we'll be doing this fun little Box Pleat technique. It's a fun way to score a strip of Designer Paper and add some great dimension to a card.
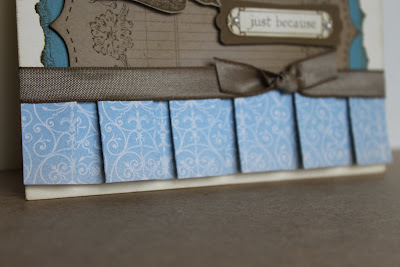


Here's a closer look at the Box Pleat section - I just love it! And I absolutely LOVE how our new Simply Scored makes this so easy to do!!


And check it out from this view - cool, huh? It kind of reminds of the little skirt/jumper that my daughter wore for her school uniform (seems like yesterday, but about 15 years ago!).


And for the top part of the card I used the set Notably Ornate. I've been wanting that set, and finally got it - and I Love it! Pretty and vintage-y!


Hope to see you at class this Friday!


Thanks for stopping by,


Julie


Tuesday, August 30, 2011

Loads of Love for Alex!


I made this card today for my son. He's taking the test for his driving permit, and it's not the first time... So, I hope this time is the charm! He was being kind of lazy in studying for it when he took it before. I think he thought it wouldn't be that hard. Anyway, he has been studying and took a couple practice tests over the weekend. I know he's worried about it, so I decided to make him a card. I know he doesn't always seem to appreciate the cards I make, but I still wanted to show him that I care.

I used the Loads of Love set, and added the boy and dogs from the Loads of Love Accessories set. It was the most appropriate set I have for a driving kind of card.


And I wasn't sure about what saying to use so I combined some parts from both of the Loads of Love sets. I kind of like how it came out. I masked the 'driving by with' and added the 'Loads of Love' to it. And I like how the 1/8" black taffeta draws your eye across to the tag. I guess the gray ribbon frosting is maybe a little feminine, but I just had to do it. I love my ribbon frosting!

Even if he doesn't appreciate the card, I just hope he does well on his test.


Thanks for stopping by,


Julie


Sunday, August 28, 2011

Sometimes You Just Gotta CASE!


I had a super busy week of just life kind of stuff, and I did have good intentions of posting more on my blog. Well, it just didn't happen. But I did get a lot of stuff done, including some upcoming projects (and stuff that I'll probably blog about another day!).

But, today, after cleaning off my stamping space, I decided to CASE a beautiful card I had seen this week - and I was dying to make! I saw this card on Stamping 411, which I do a lot of their Challenges, and it was made by Lee Conrey. She does really clean and pretty work - I love her style! So I had to make one for myself!


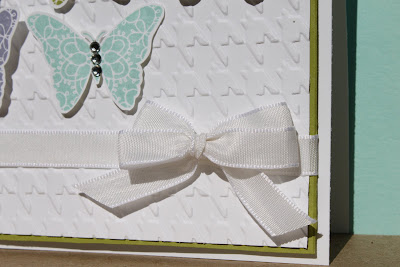
I think my card is pretty much exactly like hers. But if you have an 'eagle eye,' you might notice that I even cut around the antennae on each butterfly. I guess I either had a lot of patience this morning, or I needed the therapy of cutting! Either one is good, huh?!


And probably the hardest part was the double bow! It wasn't super tough, and I think it turned out pretty good!


Thanks for stopping by,


Julie


Tuesday, August 23, 2011

Sneakin' A Peek from the Holiday Mini - and a Challenge!


I've been working on some cards for a swap I'm in for the upcoming Holiday Mini Catalog. This is one of my out-of-the-box cards using the new set, Stitched Stockings. It's a really cute set with five different stocking stamps and two little stocking accessory stamps. I love the set for what it's intended use is (Christmas/Holiday), but for the swap I also wanted to make a different type of card.

At Convention we got to see a demonstration with the set, and it's coordinating Builder Punch (Woohoo for coordinating punches!). And that's how I was inspired to make the stocking into a baby bootie. After I decided to make the baby booties, I found a great Sketch Challenge to help me create the rest of the card!


I found this Sketch at Craft Project Central, and it's their Creating Pretty Cards Challenge for August. It's a nice and clean, easy sketch to use for any 'pretty' card, huh?


And back to the card, here's a close-up of the 'booties.' They're just a stamped stocking cut down a bit! This stocking makes the perfect bootie with the little scalloped edge to it. And speaking of the scalloped edge, I tried to keep the card together by repeating that on the little scallops on top and bottom of the framed piece. I even added the little holes in the scallops!


Of course I needed to add a cute little clothespin (luvin' those little guys!!) with some Baker's Twine. And the saying is from one of my new 'must-have' favorite sets, Petite Pairs!


Thanks for stopping by,


Julie

Sunday, August 21, 2011

Farewell to the Open Sea!


I made this card today for my husband for his birthday. I used the set Open Sea, which will soon be gone! It's in the Summer Mini Catalog that ends on August 31st. I think it's a great 'must-have' set for masculine cards! And it has the awesome 'Nautical Expedition' Designer Papers that coordinate with it.


But one of my favorite things that I figured out while making this card was that Watercolor Paper is a MUST for watercoloring! I've watercolored plenty of images, and I've always tried to skimp and use our (awesome) Whisper White or Very Vanilla cardstocks (which they are THE BEST for stamping clean images). I guess I was being kind of cheap to not buy the Watercolor paper. But, man is it worth it!!

I'm definitely a student of watercoloring - meaning I'm no expert. But seriously, the Watercolor Paper makes it so much nicer! Put a little or a lot of color on your image, and the paper lets you move the color around. You can add more water to lighten it, or add more color to darken it. You can even add different colors on top of each other. It's very forgiving - you just gotta have some on hand!!


Thanks for stopping by,


Julie


Saturday, August 20, 2011

Sailin' Away - New Look!


This is actually a card I made a while ago, and I just changed the saying. I needed a birthday card today (and didn't have the time to make a new one) so I just stole one out of my samples basket! Then I added the birthday saying from the Petite Pairs set (loooove this set!).


Here's a closer look at the saying. I punched it out with the oval punch, and stuck right where the 'hello' saying used to be! Wahlah! - a new card!


By the way, if you like the sailboat stamp 'Sail Away,' it won't be available after the end of this month. It's in the Summer Mini catalog, and that ends on August 31st.


Thanks for stopping by,


Julie

Friday, August 19, 2011

Simple Petite Pairs Wedding


Here's a wedding card I made for a wedding that we weren't able to go to. It was pretty easy, but I think it came put kind of elegant. - It's the Vintage Wallpaper Embossing Folder (and the Shimmer Spray on that layer) that makes it so pretty to me! Also, I like to use the Linen Cardstock for the base of the card.


So here's a close-up. The taffeta ribbon and background pieces are done in Perfect Plum (their wedding color). And I Love, Love, Love the Petite Pairs stamp set!! On the inside I stamped the coordinating stamp 'for the new Mr. & Mrs.' - Super cute! And, of course, added a bit of Rhinestone bling!


Thanks for stopping by,


Julie


Wednesday, August 17, 2011

A Birthday Star!


I was looking to make a simple card for one of the many August birthdays in our family, and I saw a cute one made by Niki Toll on Stampin' Connection. So I decided to change up the colors and make one too! Her colors were actually kind of cuter, but I didn't have the same papers.


Here's a closer-up of the star. I like the little banner piece coming out of the side of the star. And I like all the texture to the pieces - Where would my cards be without Embossing Folders?!


Off to make some more birthday cards...


Thanks for stopping by,


Julie


Tuesday, August 16, 2011

Gettin' a little Funky with a Challenge!


I still can't get enough of these Beau Chateau papers - just sweet and soothing to me! So I pulled out a few sheets of that. And I really wanted to break out my new Simply Scored today, so I decided to make a Beau Chateau medallion to start out this card.


It came out pretty big and bold so I added some other punched circles, and an oval, to kind of mellow it out! But I think it's super fun to make these medallions - and especially with the Simply Scored (you'll hear more about it soon; it will be for sale starting in September).

I also added some 'any-color-pearls' to the tag. If you weren't at my last class, or don't what I'm talking about, it's the pearls with a hint of color on them. I just added a little permanent marker right onto the pearls - and gave them a new look - fun, huh?!


And here's the Sketch from Stamping 411 that I followed to make my card this time!


Thanks for stopping by,


Julie

Sunday, August 14, 2011

A Fun Weekend!


It was a super busy, but fun weekend at the Expo. It was nice to see friends that stopped by, and also meet some new people too!

We got a lot of nice compliments on our booth! This picture above was one of my favorite sections, even though I loved how the whole thing came together. But I liked it because it really got me motivated and thinking about Halloween!! I love the medallion wreath that Elizabeth made, and the banner above it that Tami created. I feel pretty lucky to have such creative friends that inspire me!


I think this is one of the only pictures I got of Elizabeth, (always workin'!) during our set-up time on Thursday before it all started! She master-minded a lot of the grand scheme of the booth.


And here's my 'fabuloso' upline, Tami Waddell. I couldn't have been more fortunate to get such a supportive and generous upline! She's the best!!


And this is Kaylene. I love this girl! She is my sideline (also in Tami's first level of demonstrators, like me and Liz). She was here to help with the Expo booth, but she has been living in Qatar (in the Middle East) for the last seven years.

It was really a lot of fun having the booth and sharing Stampin' Up! with people this past weekend! And I couldn't feel luckier to be hangin' with some of my favorite people!


Thanks for stopping by,


Julie

Friday, August 12, 2011

A Tribute to Liz!


Last night, at about this same time (midnight), I was making a few extra cards to fill some spots in our Expo booth. My 'assignment' was to use the Mocha Morning papers, and just keep the color scheme - no other parameters. So, I had maybe two to finish - and I had a fun, midnight 'I'm-pretty-tired'-kind-of-idea :)

I thought the striped papers in this paper pack are perfect for a man's shirt - so, here it is ~ a shirt card! It's an easy origami fold - (easy to google for the directions if you need them).

And, I made it in honor of Liz, one of my Stampin' Expo buddies! I completed the 'assignment,' and hope she likes my card.


Thanks for stopping by,


Julie

Thursday, August 11, 2011

Come See Us at the Expo!


Today I helped set up at the Santa Clara Scrapbook Expo with some of my Stampin' buddies. We'll have a booth - and it looks amazing! I hope you'll be coming to see us!

This lamp is one of the projects I made for our Beau Chateau section. I was inspired by a lamp that was on display at Convention last month. I changed mine up a bit - used different paper and a different flower die, and added ribbon and a tag.


And here's a closer-up of the tag. It's one of the Beau Chateau Side Notes with some extras.


I hope you come by and visit us on Friday or Saturday!


Julie

Tuesday, August 9, 2011

More Magnificient Mocha Morning!


This card was a 'sorta' copy from a card I saw on the boards at Convention. It was done pretty much the same, just a different saying in the middle (which I didn't have). And I added a little Polka Dot Embossing Folder texture to mine!

But, once again, I used the Mocha Morning Specialty papers - I just love this Crumb Cake piece with the black flocking on it, it's just so striking!


Here's a cool way to put a bow around your card! I tied the bow first. Then I laid that on the corner, and put the tails around to cover the opposite corner - and stuck it all down on the back sides!


And here's a full picture again. You can see how I made the base of the card a 4 1//4" X 5 1/2" piece of black card stock. And the actual card part that opens is a smidge smaller and glued onto the 1/4 sheet of black. I did add a piece of Polka Dot Embossed Crumb on top of the card for some added texture too!

Oh, and the 'thanks' comes from the new Kindness Matters stamp set.


Thanks for stopping by,


Julie


Sunday, August 7, 2011

I Need a Friend...


...or friends (stamp, that is!). Well, we always need more friends! But, in this case, I'm not at home and I don't have a 'friends' stamp with me. The 24/7 piece is from the Beau Chateau Side Notes. (They are super fun to add to cards and projects, and I love the Beau Chateau papers - so soft and pretty, and my favorite colors.) But the 24/7 piece just seems to need a 'friends' tag, or maybe 'love.' SO, I'll probably do an add-on when I get home!


And here's one of the super-cute little clothespins. I added a Pink Pirouette Bitty flower punch, and Bitty Button to it. And of course a little Linen thread! So that's probably where I can easily add a little friends tag when I get home!


And here's the Sketch from Stamping 411 that motivated me to make this card - gotta love Sketch Challenges!


Thanks for stopping by,


Julie

Friday, August 5, 2011

Magnificient Mocha Morning Purse!


This new Mocha Morning Specialty paper is just awesome!! The felt embossed images are to die for - and then turn it into a purse, Super Awesome! And all it takes is a 6" x 6" piece of Designer Paper. On your piece of Designer Paper you just score at 1 1/4" on two opposite sides. Then you turn and score the other opposite sides at 2 1/2". Once you fold up the sides, you make diagonal folds to push in the sides of the purse.

Don't you just love how the Basic Black cardstock straps and edges really 'pop' the pattern on the paper? It's even more cool in person!

If you were at my class today, this was one of our creations - and they even got a couple Ghiradelli squares to put inside (or eat if they wanted!). It's a perfect little purse for a Gift Card Holder too.


Thanks for stopping by,


Julie

PS - The brad is from the Filigree Designer Brads.


Monday, August 1, 2011

Casing Myself for Class!


Here's a card we'll be making at class this Friday. It may look a little familiar, and that's because it's a CASE of one of my own cards. I used a different stamp, but it's from the same set, Button Buddies.


I decided to use this particular stamp because I wanted to show the "Any Color Pearl" centers on the flower buttons. First of all, those super-cute little flower buttons scream for a center. And although the Rhinestone Jewels are one of my favorites, I think the Pearls, especially with color on them, make the flower buttons POP!

So, if you're coming to class on Friday, you'll learn the little secret to making that color happen!!


And because I can't just leave a cute card cute, I had to add a "to die for-cute" clothespin... and if you have a clothespin, it's got to have a cute accent... yep, a linen thread bow.


I hope to see you at class on Friday,


Julie