Wednesday, December 30, 2015

Number of Years Anniversary Card!


Today I was making cards for a swap I'm participating in, using the new set Number Of Years. - I LOVE this set! And the Framelits that go with them - definitely on the top of my list from the new Occasions Catalog!! So anyway, as I was planning my swap cards, I got a little stuck and realized that I hadn't participated in the Creating Pretty Cards Challenge yet! So Bam!! There was my layout idea!


I knew I wanted to make some kind of Anniversary Card - and this layout worked perfectly, I think, for this card!

Here's a little closer look at the focal point of the card. I used the Framelit numbers without stamping - giving the numbers a more bold look. And I used Silver on the ribbon, doily and strip between the Whisper White and Basic Gray of the card front. - Those pops of silver really stand out when you see it in person!


You can still participate in the Card Challenge too, just hop on over to Craft Project Central and check it out!

Thanks for stopping by,


Julie B


Baby's First Year Mini Scrapbook & Card!

If you've got a new baby in the family, or a friend has had a baby, then you really should make this mini scrapbook for them. This mini scrapbook is a great little keepsake for the baby's first year. There is room for a picture of the baby for each of its first twelve months, along with two pockets to put little keepsakes in. This scrapbook shows a new way to use the Project Life Baby Girl Card Collection and Hello Baby Accessory Pack. It also features the Hello Baby Stamp Set. It can be customized for a baby boy by using the Project Life Baby Boy Card Collection instead. This would also make a great Project Life Class.
This cute project was made by Christy Fulk, and it's the Bonus Project for the month of December over at Craft Project Central. Bonus projects can be obtained by subscribing to two or more months in a row, putting the Craft Project Central badge on your blog, or by referring a friend and when they subscribe, letting us know. 
Thanks for stopping by,
Julie B 

Monday, December 28, 2015

Sewn Box & Cards Gift Set!

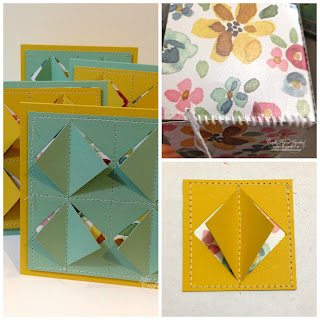
Do you love to sew and to do paper crafts?  If so, then this is the project for you!  In this project you’ll sew a gift box and some great cards to go in it!  Give the set as a gift (tag instructions included too!), to a crafty friend who will appreciate the time and creativity that you’ve put into this fun gift!

This sweet project was made by Michelle Wecksler. You can get her tutorial when you subscribe to the month of December over at Craft Project Central.

Thanks for stopping by,


Julie B 

Saturday, December 26, 2015

Snow Day Fun!

It’s 10 a.m. on a snow day. The snow is piling up outside and doesn’t look like it’s going to stop, and then you hear those three dreaded words – “Mom, I’m bored.” Keep your children entertained with this Snow Day Fun set. Use the Stampin’ Up! Snow Place bundle to create mix and match elements that will cling to the scenic background board. It’s simple enough for older children to create for younger siblings or neighbors, and smaller children will enjoy mixing the pieces to create cute snow scenes. Best of all, it’s durable enough to stand up to hours of use by tiny fingers. If you don’t have children, you can create this project for a friend who does and make a young child’s day. Instructions for a storage/gift box and a coordinating card are included. This would make a fun class for moms so they’ll be ready for that first snow day!
This cute project was made by Buffy Cooper and you can get her tutorial when you subscribe to the month of December over at Craft Project Central
Thanks for stopping by,

Julie B

Tuesday, December 22, 2015

No Bones About it...Quick and Easy Cards and Packaging!

This project includes two cards and two gift packaging ideas that are quick and easy…and no bones about it…they’re super cute, too!  The No Bones About It Stamp Set is featured and provides the dinosaur theme for each project…and Schoolhouse Designer Series Paper provides fresh, fun colors and patterns.  Those colors and patterns also bring the versatility that allows you to create for either the special little boy or girl in your life!  For a final finishing touch the matching envelopes are a cinch using the Envelope Punch Board.

This super cute project was made by Sue Plote, and you can get her tutorial when you subscribe to the month of December over at Craft Project Central.

Thanks for stopping by,


Julie B

Saturday, December 19, 2015

Handbag Card Set!

Everyone needs some pretty colors and flowers to get them through the cold winters, and this card set would definitely cheer them up! The cards are stored in a cute little handbag with pretty Antique Brads on the handles. The handbag can hold eight cards and envelopes. This tutorial includes two card designs made with the Remarkable You Stamp Set, and four of each design can be made to fill up the handbag. This would make a perfect gift, and a great class project.

This cute project was made by Christy Fulk and you can get her tutorial when you subscribe to the month of December over at Craft Project Central.

Thanks for stopping by,


Julie B 

Wednesday, December 16, 2015

Water Colored Masculine Gift Card Set!

Have you ever wanted to try your hand at watercoloring but thought you couldn’t do it?  Here is your chance to give it a try using the masculine set The Wilderness Awaits and an Aqua Painter. The step-by-step instructions will show you how to make a wonderful set of four masculine cards with envelopes that fit right in the box that showcases your water colored creations that you can give away as a gift or keep for yourself.

This great project was made by Sara Hoogendoorn and you can get her tutorial when you subscribe to the month of December over at Craft Project Central.

Thanks for stopping by,


Julie B

Sunday, December 13, 2015

Go Wild & Pamper Yourself!

This gift set is a mini spa day packaged in a coordinated kit. This set includes a nail file holder, a nail polish caddy, and chocolates that all fit inside a unique gift bag. There is also a matching gift card holder to add a little something extra. This spa day kit is perfect for that special person who deserves an indulgent gift. There is also a bonus recipe for a sugar scrub to add as an optional gift!

This awesome project was made by Boni Montano and you can get her tutorial when you subscribe to the month of December over at Craft Project Central.

Thanks for stopping by,


Julie B

Thursday, December 10, 2015

English Garden Box & Cards!

Need a fantastic, useful, and attractive gift for someone special?  You will enjoy making this project, and the recipient will cherish it!  Create six pockets to hold an assortment of cards, a box to hold the pockets, and this tutorial also includes instructions for six assorted—coordinating—greeting cards to start filling the pockets.  Once you give this box of cards to a special someone, don’t forget to replenish the cards throughout the year on holidays, special occasions, or just because.  This ensemble would be great for a stamp camp.

This sweet project was made by Regina Andari, and you can get her tutorial when you subscribe to the month of December over at Craft Project Central.

Thanks for stopping by,


Julie B

Monday, December 7, 2015

Everlasting Luminary Gift Set!

This sweet and sparkly little gift set is sure to please! Learn how to quickly, and elegantly, turn a battery-operated tea light into an everlasting décor piece. Then you’ll learn how to make the coordinating gift box that is the perfect custom size to fit the three tea lights. And the simple, but sweet card will make this the perfect hostess gift for those holiday drop-ins!

This fun little set was made by ME!! And you can get the tutorial when you subscribe to the month of December over at Craft Project Central.

Thanks for stopping by,


Julie B

Sunday, December 6, 2015

Creation Station December Blog Hop!


Thanks for joining the Creation Station Blog Hop! I hope you enjoyed Nicole's awesomeness! 


I made this elegant card with the Embellished Ornaments stamp set and the Delicate Ornament Thinlits Dies. I LOVE clean lines and simple design - and this fits the bill to a tee! ;) 


When the Holiday Catalog came out, I knew this was my bundle! - I just love something that is simple and clean, but that makes a statement! I started with a Smoky Slate card base and used the Softly Falling Embossing Folder. Then I die cut the detail ornament framelit with Elegant Eggplant Cardstock (a little non-traditional colors, but Love it!), and then I die cut the open ornament and ornament topper in Silver Foil. I love the contrast between the Eggplant and the Silver! But even more, the Silver Cording Trim and the Iced Rhinestone Embellishments give that little extra pop (without overwhelming the simplicity), right?! 


And since I'm trying to be better about having the inside of my cards completed, I did that too! I added a Whisper White piece to the inside of the card, with a little strip of Everyday Chic Washi Tape along the bottom of it.


And with the framelit circle cut-out front on the card and the dangling ornament, it was a slight challenge to add a sentiment on the inside. But I made it happen! Here's my little Tip below:


I used the cut out piece from the open ornament, and placed it on the inside of the card, right where the outside piece fit, and then opened the card. Then stamped the saying right inside that negative space piece. - Super easy! And then it becomes perfectly hidden when the card is closed!

Hope you liked my card! And I hope you enjoy the next post by the awesome Denita Wright!

Here are the links if you'd like to go back to visit Nicole's post or forward to see Denita's! Enjoy the Blog Hop!!


Thanks for stopping by,


Julie B


Friday, December 4, 2015

Winter Holiday Punch Art Tag Set!

Punch art is a fun way to create images that you may not have stamps for, as well a great way to get extra mileage out of your punches. In this project we will create punch art images for Christmas, Hanukkah, Kwanzaa, and New Year’s Eve. Each of these images is part of a cute tag, and all of the tags fit nicely in a decorative box. Includes a matching card for gift giving. These fun punch art designs are great for a club or a class, or just a fun winter afternoon of crafting.

This super fun project was made by Yapha Mason, and you can get her tutorial when you subscribe to the month of December over at Craft Project Central.

Thanks for stopping by,


Julie B

Tuesday, December 1, 2015

Home for Christmas Tags!

We will be making this little stack of Christmas Tags and the fun little Gift Bag Pouch to store them in at stamp class this week! 

The tags are quick and easy with our Ornate Tag Topper Punch - and I Love all the little images from the Home For Christmas Designer Series Papers! There's a little bit of cute and a little bit elegant - something for everybody!

And the Gift Bag Pouch - super easy! A score line across a Gift Bag, use some Tear & Tape to seal the edges, and you have two pockets to hold the gift tags! Cool?! And with the fun details on the front, you can re-use it as gift card holder. 

I hope to see you at class this week! We have some super cute and fun cards to make too!!


Julie B

2016 Calendar / Keepsake Gift Book Set!

Are you looking for a thoughtful gift for a special person this Christmas or for an upcoming birthday? This 2016 Calendar/ Keepsake Book Gift Set is a wonderful choice! This calendar will not only look beautiful sitting on a desk or counter, but it will also turn into a keepsake book at the end of the year. There is space to write down goals for the New Year, record special memories and each month has a place for a treasured photo. The calendar and custom pen fit nicely inside the gorgeous gift box that doubles as storage when the year is done. And don’t forget to add the matching card! This lovely card is the perfect way to let your recipient know that you are thinking of them.

This pretty project was made by Julie Warnick and you can get her tutorial when you subscribe to the month of December over at Craft Project Central

Thanks for stopping by,


Julie B  

Monday, November 30, 2015

Last-mInute Christmas Gifts!

We all have that one holiday gift we forget to buy, don’t we? The new neighbor, our hair stylist, Uncle Joe who just moved back to town…forgetting a gift for any of these could cause more stress during a season that should be fun. If you have a last minute addition to your list, here are a few ideas that are quick and relatively simple. Best of all, they use products that almost every crafter keeps on hand. The projects use the Jingle All the Way Bundle to create gorgeous gifts anyone would love to receive. They also make beautiful home décor pieces for your holiday decorating. And since they’re winter themed, they can stay up into the New Year.
This fun and practical project was made by Buffy Cooper, and it's the Bonus project for the month of November over at Craft Project CentralBonus projects can be obtained by subscribing to two or more months in a row, putting the Craft Project Central badge on your blog, or by referring a friend and when they subscribe, letting us know.
Thanks for stopping by,

Julie B 

Saturday, November 28, 2015

Honeycomb Star Ornament Gift Set!

Make this beautiful 3D honeycomb star ornament to deck your halls with some holiday sparkle. Or give this lovely ornament as a gift with the coordinating card and box that allows the ornament to spin inside and show off that sparkle. This would make an excellent hostess gift or class project! The patterns, colors, and stamps can easily be changed out to match those of another holiday if you don’t celebrate Christmas.
This super cool project was made by Amanda Corbet, and you can get her tutorial when you subscribe to the month of November over at Craft Project Central.
Thanks for stopping by,

Julie B

Wednesday, November 25, 2015

Altered Muffin Tin Decor & Greeting Card!

As the holiday season is nearing, wouldn’t it be fun to decorate your home with this holiday décor item? Perfect for your table, wall, or refrigerator, this sweet 3-D project could also work as a countdown calendar, and for hiding holiday treats and treasures. Give your craft punches and dies a workout to make holiday scenes, getting a glimpse of all the fun and precious things you are looking forward to. This project is also great for holiday stamp camps and small classes.

This sweet project was made by Monika Davis, and you can get her tutorial when you subscribe to the month of November over at Craft Project Central.

Thanks for stopping by,


Julie B

Sunday, November 22, 2015

Hello December Organizer & Holiday Accessories!

You’ll say a happier hello to December when you’re organized and ready for this busiest of months!  This project features the Hello December 2015 Project Life Card Collection and Hello December 2015 Project Life Accessory Pack as a fun organizer…with the support of a double Berry Basket to help keep everything together!  This project also includes lovely ornaments, three sets of holiday gift tags and three holiday greeting cards.  This project and these amazing Project Life cards…in combination with the bright, fun accessories...are the perfect canvas for an organized December and a lovely holiday season!

This super cute project was made by Sue Plote, and you can get her tutorial when you subscribe to the month of November over at Craft Project Central.

Thanks for stopping by,


Julie B

Friday, November 20, 2015

Thankful for a Quick Sketch Challenge!

Thanksgiving is right around the corner, and I wanted to make a couple cards to send out before the big day is here! So I used the Creating Pretty Cards sketch over at Craft Project Central to get me inspired. I love the simple, and quick layout this time!

Here's the sketch ~

I used the Into the Woods Designer Series Paper, the Thankful Forest Friends Stamp Set, and my latest favorite little add-on is the Brights Sequins. I love the little Pop! those sequins give any project!!

You have time to join the Creating Pretty Cards Sketch Challenge - just hop on over to Craft Project Central, and check it out!

Thanks for stopping by,


Julie B

Wednesday, November 18, 2015

Advent Calendar Banner Box Set!

Celebrate each day of December up to Christmas with a sweet little treat all held on a twine banner in these cute little boxes that are all decked out in red and gold. Want to give this banner as a gift? The coordinating box holds all 25 boxes folded flat with mini clothespins, twine, and decorative trim.

This awesome project was made by Amanda Corbet, and you can get her tutorial when you subscribe to the month of November over at Craft Project Central.

Thanks for stopping by,


Julie B

Sunday, November 15, 2015

Christmas Lodge Gift Set!

With the holidays approaching, many of us are looking for creative gifts and packaging to show appreciation for the wonderful people in our lives. Look no further! Delight someone special on your list with this beautiful Christmas Lodge Gift Set! The Christmas Lodge Gift Box looks like it was taken right out of a charming mountain scene. It is a stunning way to package goodies or a gift and can be used as a decorative centerpiece after the gift is opened! And the December 2015 Mini Book is the perfect gift to go inside! Learn the simple saddle stitch to create this custom book and create a photo album or journal to capture all of the Christmas memories this year. A coordinating card tops off this festive ensemble! And if you want a quick way to package gifts and treats this holiday season, the tag in this set is an easy way to dress up a cellophane bag.

This fun project was made by Julie Warnick and you can get her tutorial when you subscribe to the month of November over at Craft Project Central.

Thanks for stopping by,


Julie B 

Thursday, November 12, 2015

Peaceful Pines Stamp-a-Stack & Card Case!

You’ll enjoy the ease of using one stamp set and one set of dies to create a variety of Christmas cards that feature an array of simple decorative elements and techniques.  With this tutorial, you will make six cards and decorate a stamp case for storing them until time to drop them in the mail.  Once the case is empty, you’ll probably end up placing a gift in it for someone since it’s decorated and ready to go!  This ensemble is perfect for a class or stamp camp!
This pretty project was made by Regina Andari and you can get her tutorial when you subscribe to the month of November over at Craft Project Central.
Thanks for stopping by,

Julie B

Tuesday, November 10, 2015

Decorative Masks Sampler Inspiration Canvas!

What can you do with decorative masks?  This tutorial is designed to expose you to a myriad of techniques you can use with your purchased or DIY decorative masks!  Learn how to combine masks with modeling paste, inks, sanding blocks, pens and more!  This canvas incorporates all of these techniques into a beautiful home décor item that is perfect for gift giving or hanging on your own wall.  Let’s explore what you can do with decorative masks!

This creative project was made by Michelle Wecksler, and you can get her tutorial when you subscribe to the month of November over at Craft Project Central.

Thanks for stopping by,


Julie B 

Saturday, November 7, 2015

NOEL Square Pillow Box Garland Gift Set!


Hang this festive garland for the holidays! The Square Pillow Box Thinlits Dies makes this cute décor item a cinch to put together! Plus, you’ll learn how to adapt the pillow box to make an Altered Open-Top Pillow Box – perfect for holding some special treats. After you’ve made a set for yourself, you can make the coordinating card and give another set as a gift! 

This holiday project was made by ME!! And you can get my tutorial when you subscribe to the month of November over at Craft Project Central.

Thanks for stopping by,


Julie B

Wednesday, November 4, 2015

Poinsettia Christmas Tree & Picture Frame!

If you love poinsettias at Christmas time, then this Christmas tree and picture frame will be perfect additions to your Christmas décor. The tree is full of poinsettias, and the frame has a beautiful large poinsettia attached to it. The frame would be perfect for a picture of your kids with Santa! This tutorial teaches how to make two different size poinsettias with the Festive Flower Builder Punch. It also features the Reason for the Season Stamp Set and Season of Cheer Designer Series Paper.

This pretty project was made by Christy Fulk, and you can get her tutorial when you subscribe to the month of November over at Craft Project Central.

Thanks for stopping by,


Julie B

Tuesday, November 3, 2015

Self Closing Box for Stamp Class this Week!


This is the super fun box we're making at stamp classes this week! I found the design from a fellow demonstrator in Minnesota, Tanya Boser. She also used the Into the Woods DSP, which I really wanted to use - with it finally starting to be Fall around here! And I really love the contrast of the browns with the Rich Razzleberry! 


And here ya go, with a little closer look - Simple, but striking! Or, at least I think so!! 


And this is the coolest thing about the box - with a little squeeze on the sides of the box, you open the top! Too Cool, huh?! Let go, and it closes! 

And even cooler, there will be treats at class to put inside!! :) Well, unless you decide to eat them! :)

Hope to see you at class this week,


Julie B

Sunday, November 1, 2015

Thankful Scrapbook with Pockets!

This fun-to-make book can be used for so many things – a scrapbook, a gratitude journal, a cook book, and more! It features the gorgeous Into the Woods Designer Series Paper for a fabulous fall look. There are lined pages for writing, pockets for adding items, and room for pictures. Preserve your autumn memories or give it as a gift with the matching card. It would also make an excellent class or club project.

This fun project was made by Yapha Mason, and you can get her tutorial when you subscribe to the month of November over at Craft Project Central.

Thanks for stopping by,


Julie B

Creation Station Blog Hop - Lighthearted Leaves!

Hi there! If you're joining me from the Creation Station Blog Hop, welcome to my space! I hope you enjoyed Jennifer Downey's post. If you missed it, you can click HERE to go back. Here's what I have to share with you ~


I set out to achieve an elegant look with the Lighthearted Leaves stamp set. And what says elegance better than gold?! Well, maybe embossed gold!! So I embossed a few of the different Lighthearted Leaves in Gold onto the Blackberry Bliss Cardstock - so striking! I'm in love with the look!


On the card, I added some Winter Wonderland vellum paper onto a piece of Vanilla Cardstock to set off a little gold bling for the background. Then I added a layer of Gold Foil Sheet to the back of it!

And, for a little contrast on the leaves, I added some touches of Blackberry Bliss Marker in random spots. I also added both Gold Thread and Gold Cording Trim to stick with the Gold theme! And, oh those Gold Sequins... Wasn't a huge fan at first, but now I can't stop using sequins!!! They add just that "something needed"!


Usually I spend so much effort on the front of a card that I don't do anything for the inside. But, especially with a dark color card base like Blackberry Bliss, you have to do something on the inside. A little strip of the same Winter Wonderland Vellum on a Very Vanilla Cardstock piece neatly finishes it off! And, a little tip - To adhere the vellum, I cut the piece about 1/2" longer than the width of the cardstock piece. Then I 'glued' it down to the backside of the Vanilla cardstock with Mini Glue Dots. Then I glued to whole piece onto the inside of the card.


I think these little gift bags make a cute little coordinating match-up to give a little gift or treat! How about setting a few out on your Thanksgiving table?

I used a lot of the same details from the card. But also, I added the Winter Wonderland Washi Tape to go around the bag. And I used a small Gold Doily for a little more bling! The Wooden Elements "Celebrate" seemed to be a fitting sentiment to add to the bag too!
  

I altered the Kraft Gift Bag to make it a Stand Up styled bag too! I just scored it at 3/4" on each side and 1" along the bottom. Then I trimmed, folded up and adhered the bottom to give it that stand up style!

I think I will be making a bunch more of these for Thanksgiving! But also, I think I will use the Thanks Wooden Elements pieces to make some quick Thank you Bags too!

Hope you enjoyed my project, and come back soon to see more!

Up next on the Blog Hop is Kathy Kartak. Click HERE to check out her creation!


Julie B

Saturday, October 31, 2015

Christmas Tags & Ornament in a Box!

It’s time to get ready for Christmas! This project would make a wonderful gift, and anyone would love to receive it. While you’re at it, make one for yourself, too. The tutorial includes a decorated box with a window, and has five compartments to hold 20 tags and a Christmas ornament. It also includes four different tag designs, and five are made of each. It includes a little Christmas ornament, too. The project features the Snow Place and Embellished Ornament Stamp Sets, along with their coordinating dies.

This fun project was made by Christy Fulk, and it's the Bonus Project for the month of October over at Craft Project CentralBonus projects can be obtained by subscribing to two or more months in a row, putting the Craft Project Central badge on your blog, or by referring a friend and when they subscribe, letting us know. 

Thanks for stopping by,


Julie B