Sunday, December 3, 2017

Creation Station Blog Hop - Metallics Gone Wild!


Welcome to Creation Station's Blog Hop for the month of December! We are focusing on Metallics! So with Christmas coming, I decided to make a Christmas card (with a fun-surprise inside!).

Insert Burl Ives, 'Silver and Gold', probably one of the best Christmas songs of my childhood - I loved when those Christmas specials came on TV (before we had VCRs, DVDs, YouTube and all that). We had to actually watch it when it aired - crazy that those days don't seem that long ago...

But, back to the card, Silver and Gold... in it's finest! The card is really Silver, Gold and White (not gray, if only lighting and my camera would give me some help in showing that!)! I love the simplicity, but elegance to the look of this card!


And here's a little close-up of the Silver Foil scalloped oval frame, and Stitched Oval die-cut with the saying from Merry Little Wishes...


And for the fun-surprise inside - a gift holder slotted pocket! I scored the base of the card at 2-3/4" and 5-1/2". And, on the 2-3/4" end, I pushed the Classic Label Punch all the way in (till it rested against the cardstock edge), and punched. I moved it over a bit and did the same - to create a little bit wider Classic Label. And then I used Tear& Tape to seal down that edge to the card inside. - Wahlah! - a beautiful snug little pocket for a gift card, or maybe cash.


And, finally, I added a gold embossed For, From from the Merry Little Labels set as well - for a quick inside!


I hope you enjoyed your stop! And I know you'll be impressed with the fabulous Andrea Tracy-Tucker's creation, up next...  


Thanks for stopping by,


Julie B

Sunday, November 26, 2017

Mini Calendar Project for Stamp Classes this Week!

So I try to make a calendar project each year, usually in January, for our class project. But I had a request to do it in December (probably a good idea, especially if you want to give them for gifts), so here we go! We have made so many different calendar projects over the years - and that makes it harder to find a new or original idea (or heaven forbid, create my own?!). And after many searches, I figured this out (with a little help from Carrie Rhoades) ~ 


We'll be using a 5-3/4" x 12" piece of Basic Black Cardstock for our base - and I Love this!! Just a few score lines and easy cuts - then fold and assemble!

And add just a little piece of Whole Lot of Lovely Designer Series Paper (1" x 3-3/4") sets off the black background underneath the calendar.


And then when you flip it around to the backside - this super cute, and useful pocket, with a little bit (1-3/4" x 3-1/2") of the same DSP on it, for a post-it notepad and mini gel pen! 

I hope you will be coming to class this week to make this with us!


Thanks for stopping by,


Julie B


Sunday, November 5, 2017

Creation Station Blog Hop - Perfect Packaging!


Welcome to Creation Station's Blog Hop for November! This month we are showing off Perfect Packaging! - Just in time for the upcoming holidays!

There are so many cute things that our Stampin' Up! catalog offers for packaging ideas! And our Holiday Catalog has even more to offer... When I saw the Acetate Card Boxes I knew they would be great for sending a set of cards, but I knew there would be some other great ideas for them. 

So I'm not the original creator, but I loved how the Acetate Card Boxes have been cut in half and made into various gift boxes.  


For these ones, I added the Year of Cheer Specialty Designer Series Paper to the open top, half-Acetate Card Box. I started with a 4-1/2" x 4-1/2" piece. Then I scored it at 2-7/8" and 3-1/2". - That makes the back, the top and front flap.


The bottom edge tucks perfectly into the acetate box flap on the bottom - so no adhesive is necessary to attach it anywhere! 


And whichever treats you wrap and put inside, the backside of the DSP stays nice and flush with the box.


On this box, I used sayings from the Merry Cafe stamp set. And I added the Metallic Foil Doily in Gold underneath the layered ovals. (The other box has a saying from the Tags & Trimmings stamp set, and layered onto the Foil Snowflake.) 


I used magnets to close the flap, but you could use velcro dots too!

I hope enjoyed your stop here, and here are some more fabulous options for the Blog Hop ~


Thanks for stopping by,


Julie B

Sunday, October 1, 2017

Creation Station Hop - Tricks of the Trade!


Welcome to Creation Station's Blog Hop for the month of October!! We are highlighting Tricks of the Trade this month! So I chose one of my new favorite Holiday Catalog stamp sets and a fabulous new punch - to show you some cool stuff (plus a little something from one of my all time favorites!)... 


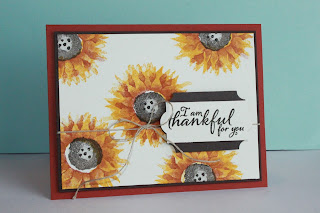
I made a coordinating card and little gift box using the Painted Harvest Stamp Set!


So, first off, I have a little stamping tip, and then also a punch trick!


To be honest, I got this stamp set (probably my first choice pick from the new Holiday Catalog), and then was a little disappointed... it didn't really stamp as well as I had hoped. I stamped the first image in Crushed Curry, and then the detailed one in Cajun Craze. - Not super impressed... 


But after adding another layer of the first (more solid flower) again in Crushed Curry, tah-dah!! - I love it!! So I added a few more to cover the card front!! LOVE!!


And, for a little Trick using the Everyday Label Punch - first, stamp a saying (this was from the Painted Harvest set). Punch it out, centered, with the Everyday Label Punch.


Use the Stampin' Trimmer to cut the top and bottom edges off (use the pointy edge, at 1-1/4" and 1" lines to help you line it up).


Punch another full Everyday Label Punch from Early Espresso to layer the trimmed one onto. Add Stampin' Dimensionals to layer them together and then onto the card front ~


And here's a peek at the simple inside of the card - also using words from the same stamp set, Painted Harvest.


So, to make the tag for the Clear Tiny Treat Box, I used the same Everyday Label Punch - performed another little 'trick'! I stamped the image (from the Orange Blossom Stamp Set), and then punched it out with the saying kept a little to the right. I placed it back into the punch and centered it, punched again - trimming off about 1/4" of the detailed edge. Then I used the Stampin' Trimmer, as in the above tag - and trimmed off the top and bottom edges.


And, I punched another Early Espresso Everyday Label, and trimmed 1/8" off the top and bottom edges.


I then layered those to make another smaller tag version!


And, another little quick trick - punch a hole, and snip from the edge, to create a tag that can be slid directly onto the tied ribbon!


The tag was added to my favorite treat box - (and I customized the paper that lined the box - just coordinating it with the card)!


I hope you enjoyed your stop on my blog - and here's some more to see!

You can go back to see Andrea Tracy Tucker's awesome work, or Hop On to see Mikaela Titheridge's wonderful creation...


Happy Creating,


Julie B

Saturday, September 30, 2017

Halloween Treat Tote for Class!


Here's the super sweet Halloween Treat Tote that we'll be making in stamp classes this week!! I originally made this in a larger size a couple years ago - and I've always loved it! So cute that it stands up, and it's like a little beach tote.

So, by request from a few customers who saw this little version on display at our last class, I decided to add it to the line-up for class this month! Like I said, it's a smaller version of the original we made a couple years ago, but it sure holds a lot of treats! And, I love that you can get 5 of them made from each piece of 12" x 12" Designer Series Paper! - And just think of all the versions you can make for different holidays and occasions...


Hope to see you at class this coming week,


Julie B

Tuesday, September 5, 2017

Getting Ready for Halloween at Stamp Classes this Week!


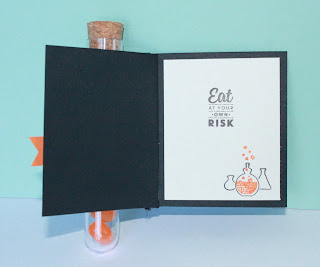
I saw this cute idea from another demonstrator, Dawn Griffith, and I loved it!! So I adapted the size a little bit (cuz I wanted a little larger 'card'), and did it up for Halloween!!

I love making little treats, but this really got me because of the addition of the little card that is built in to the project too - super nifty! ;)


Here's the inside of the 'card' part. I love the new Spooky Night Designer papers - there are so many cool things that go with it... stamps, framelits and punches, oh my!!


And these treat tubes - Super cute!! They don't hold a ton, but I just love them!!

I hope you'll be at stamp class to make this project with us,


Julie B

Sunday, August 6, 2017

Creation Station Blog Hop - August in My Neighborhood!


Welcome to Creation Station's Blog Hop for the month of August! Our theme this month is 'August in My Neighborhood' - and the first thing that comes to mind for me is family birthdays! And, in particular, we have a lot of male birthdays this month. For me, a masculine card is sometimes a challenge because I feel like simplicity in design is a good idea, but I don't want it to be too boring...


So, for one of the cards I have ready for this month of masculine birthdays, I started with the Happy Birthday Thinlits die. I think this is a 'must-have'!! I die cut it from Silver Foil for the focal point of the card. 


Besides the two die cuts that I used for the background of the card front, I also layered the Silver Foil piece onto two more Island Indigo die cuts to give it a little bit of thickness and some added dimension. 


I also added two Island Indigo punched balloons onto the background, a subtle but added detail. 


And each of the balloons have a Silver Thread for the balloon string - again, subtle, but an added detail!


And finally, a simple greeting inside the card!

I hope you enjoyed your stop here, and I can't wait to see what's happening in the rest of the hop!! Here are your choices from here -  


Enjoy,


Julie B

Tuesday, August 1, 2017

Four Nugget Treat Box for Stamp Class this Week!


I found this super awesome Treat Box from The Paper Pixie, another Stampin' Demonstrator - and I'm obsessed with how cute and fabulous it is!! It is made from a piece of 6" x 6" Designer Series Paper (awesome because you get 4 from a sheet). And from that, you make the box...


And you're able to wrap four Hershey's Nuggets - ALL of that with one 6" x 6" piece of Designer Series Paper?! So cool!! And I love the Naturally Eclectic DSP - the color palette is so beautiful!

I hope you'll be at stamp class this week to make one with us!


Julie B

Tuesday, July 11, 2017

Super Sweet and Simple Triangle Treat Box for Stamp Class!


We will be making these super sweet Triangle Treat Boxes at stamp classes this week! Although I Love my Big Shot, and all the other specialty tools that help us create treat holders, I Love it even more when I find a simple pattern that only needs a Stampin' Trimmer!! - A few score lines, and cuts - and tah dah, a Treat Holder is made! :)

And we'll be using the fabulous new items from the Coffee Break Suite! I'm so loving all the New Coffee Cafe stamp set, Coffee Break DSP and the coordinating ribbons! 

Of course, I found some yummy coffee treats for the inside... And did you notice another new punch we're using on the box??

Hope to see you at class this week,


Julie B 

Sunday, July 2, 2017

Creation Station Blog Hop - '2017-2019 In Color'


Welcome to this month's Creation Station Blog Hop, where we are highlighting the 2017-2019 In Colors! I really do Love them all, but I decided to make a card using Berry Burst and Tranquil Tide.

I used the Ribbons of Courage stamp set and the coordinating Support Ribbon Framelits. I received the Ribbon of Courage set as a gift at the last OnStage Local event. At first the framelits weren't a huge 'must-have' when I saw them - and then I noticed the open flower and leaf - LOVE!! 


I used touches of silver throughout the card - the new Metallic-Edge Ribbon, a layer of Silver Foil between the Whisper White layers, and the new Clear Faceted Gems (which I think look silver!).


Aren't these flowers so dainty and pretty?! And I think the Faceted Gems are a perfect flower center! :)


I hope you enjoyed your stop, and here are the links for the past and next fabulous stops on the Hop...


Thanks for stopping by,


Julie B