Friday, September 28, 2012

"Ghoul Friend" Hand Sanitizer Tutorial


Here's the cool hand sanitizer treat I made yesterday.  And here's the tutorial on how to make it!


You start with a 2-1/2" x 8-1/2" piece of card stock folded in half.  Lay it on the Two Tags die, with the folded edge just before the bottom edge.


Here's a closer look of where the fold line should be.
 

After it's die cut, score a line across the bottom edge at 1/2".
 

Then, lining the score line up with the edge of your large scallop punch, punch out an oval.  Try to keep the punch centered! 
 

On the inside back part punch two 1/8" holes in the center, about where the scallops start. (This will hold the 'neck' of your hand sanitizer bottle)
 

Feed a 9" piece of ribbon through the holes you just made.
 

Use one Dimensional to hold the bottle to the back of the card stock piece.
 

Create your scallop layers and glue/dimensional them together.
 

Glue the scallop layers to the front.  Then use your Crop-A-Dile (I know it's retired now, but it still works the best to punch through all those layers!) and punch the larger size (I think 3/16") hole in the bottom edge.
 

Feed through the ribbon ends, around the bottle and into the front hole you just made.  My hint for tying: make a knot, with the tails going top and bottom, and turn the pattern so it's facing down.

Then when you fold over, pull through the ribbon bringing the pattern side back to the front.  Other part of the hint: Hold one end of the ribbon, and pull the other - it helps make the knot a little neater in the middle.
 

Fold the ribbon in half and cut to create the 'fishtail' ends.
 

And - Tah Dah!!  Pretty easy!!  I especially like that the base of it isn't a lot of work, and really takes hardly any card stock.  The rest is scrap sized pieces too!  It's only when you decided to make a boatload of them that it takes a lot of card stock :)

Hope you have fun making some!  

Thanks for stopping by, 


Julie B

Thursday, September 27, 2012

For My 'Ghoul' Friends!


I'm getting ready for some "Ghoul Friends" to come over and do some Halloween stamping tomorrow - and I decided to give them each a little gift!  So don't tell if you know any of them, but this is what I made :)

I thought these Bath and Body Works hand sanitizers were perfect with the "Ghoul Friend" title on them when I saw them!  And I know I've seen a few different cute ways to dress them up.  But since I'm making a bunch I had to figure a cute, but not too time-consuming, way to package them up.
 

I used the Two Tags die (with a little special trick) to make the base of it, and then easy circle punches.  And I added our cute Striped Satin Ribbon to help hold the bottle inside!

I'll be making up some more of these later today, and I'll make a quick picture tutorial.  So if you want to know how to make one, check back tonight or maybe tomorrow morning.

And, boy, I think Stampin' Up! demonstrators should really get a kick-back from Bath and Body Works for showing how cute we can make their product, huh?!

Thanks for stopping by,


Julie B

Wednesday, September 26, 2012

Spooky Treats Set & Card!


Get a jump start on your Halloween projects!  These cute containers can hold great treats for your kids, co-workers, teachers, and friends!  And if you don’t celebrate Halloween or make Halloween treats, you can still use the templates to make goodies for other occasions or holidays!

I LOVE this fabulous set by the awesome Heidi King! If you do too, you can get her tutorial if you subscribe to September over at Craft Project Central!

Thanks for stopping by,


Julie B

Monday, September 24, 2012

Tea Bag Gift Box and Pop-up Card


This lovely ensemble makes the perfect gift or project for an upcoming class or workshop!  The tea bag box holds several tea bags, and the coordinating card is sure to "wow" them when they open it and see the pop-up tea cup!

This pretty set was made by Laurie Zoellmer, and you can get the details for her tutorial over at Craft Project Central.


Thanks for stopping by,


Julie B

Sunday, September 23, 2012

Happy Birthday Jessie!


Today is my daughter Jessie's birthday!  And this is the card I made for her.  It was inspired by a card I saw made by Mercedes Weber.  I did change up the colors and a few other details  though.  

I used the set Lacey & Lovely - it was a set I got at Convention this year. - So pretty with lots of possibilities...  But then I decided to add the Beautiful Birthday single stamp - love it's elegance!


For the base of the card I used the Natural Composition Specialty Paper.  It's really a piece that has a pretty floral design in the bottom corner, but I chose to use just the subtle striped section from it for the background.  I love those papers!!  

I also love the Delicate Designs folder that I used to make the 'lacy scalloped and embossed' piece in white.  I think that's such a pretty and feminine texture to add to any card!

Have a great Sunday,


Julie B  

Friday, September 21, 2012

Happy Birthday to my Sis!


I made this card to send to my sister for her birthday!  I was inspired by a card I saw over on Pinterest, and I changed up just a few details.  I didn't add a whole lot of Dimensionals to it, which I usually like to!  But that's because it's going in the mail - and I was trying to keep it flatter.

I used the Summer Silhouettes set - one of my must-haves when the catalog came out, and then it kind of got set aside!  - And here it is now, almost Fall!!  To me though it's a great all-year round kind of set anyway!


Thanks for stopping by,


Julie B

Thursday, September 20, 2012

Two Pretty Projects!


Small gift/treat boxes are nice to have on hand, and they’re even better when they can be folded and stored flat until ready to use.  This project ensemble includes a flat-fold box, a decorative floral adornment, and four note cards, complete with coordinating envelopes!  And using the cute Hoop La La stamp set, it makes a great gift for those that love cross stitch!

This sweet set was made by Regina Andari


With autumn fast approaching, it’s time to turn our thoughts to sweaters, crispy leaves, and Thanksgiving dinners (October 8th for our Canadian friends!).  This project will help you get set for your family get together by providing instructions on a warm and inviting holiday table setting, including a centerpiece, place cards, favors for your guests, a ‘grateful’ box for your guests to write what they are grateful for, and so much more!  Just add the food, the family and friends, and you’re ready to go!

And this pretty setting was made by Tara Bourgoin.

You can get the details on both of these projects over at Craft Project Central, and subscribe to the month of September.


Thanks for stopping by,


Julie B

Tuesday, September 18, 2012

Googly Ghouls for a Challenge!


I sure have gotten a lot of use from my Googly Ghouls already, and it's not even October yet!!  They're just too fun to stamp!  So I decided to join Mary Jo Price-Williams Monday Lunchtimes Sketch Challenge - even though it's Tuesday!!


Here's a closer look at the little witch and Boooo that pop from the middle of the card! 


And here's the sketch - I'm glad that all five of the Googly ghouls all fit into the sketch!! :)  Also, the sketch challenge is part of a blog hop, so you can check out what other people are doing for the challenge.  And, you can even join in - check it out!!

Thanks for stopping by,


Julie B


Monday, September 17, 2012

Candy Corn Fun!


Here's a fun Candy Corn treat holder I made.  I used the Petal Cone Big Shot Die.  And my most favorite part is that I was able to use the Summer Smooches Designer Paper!  Using my 'summer leftovers' to make a 'fall' treat!  Cool, huh?

And the saying is from the Spooky Bingo Bits set. 

I decided to enter the Great Pumpkin Blog Hop!  You can see a bunch of cool Halloween ideas over there each week.

Thanks for stopping by,


Julie B


Saturday, September 15, 2012

Monster Munchies Clamshell Box & Card


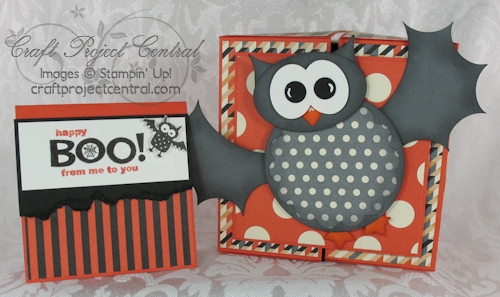
This cute little vampire owl sits atop a clamshell box full of Halloween treats!  The finished box is 4" x 4", which will hold a lot of monster munchies or perhaps some other bootiful gifts!  A simple and fun gift for kids and adults alike!

I Love, Love, Love this awesome project by Kim Score, and you can get the details on her tutorial over at Craft Project Central!  I can't wait to make one of her vampire owls!!


Thanks for stopping by,


Julie B