Monday, October 31, 2016

Thank You Rose for a Challenge!

I made this fun card for the Craft Project Central Creating Pretty Cards Challenge - I love putting the Rose Garden Thinlits pieces all together, like a little puzzle! And I think the black edging looks so striking!

Stop by Craft Project Central and see how others made cards to fit this layout -


Today is the last day to join the challenge too!


Thanks for stopping by,


Julie B

Sunday, October 30, 2016

Warmth & Cheer Christmas Ornaments!

It’s hard to believe, but it’s time to start making your Christmas projects for this year! This tutorial shows how to make four, festive Christmas ornaments for your Christmas tree. The ornaments feature the Pretty Pines Thinlits, Starlight Thinlits, and the Warmth & Cheer Designer Series Paper Pack. These ornaments would also be perfect for decorating the outside of your Christmas gifts. This would make a great Christmas class, too.

This project was made by Christy Fulk and it's the Bonus Project for the month of October. Bonus projects can be obtained by subscribing to two or more months in a row, putting the Craft Project Central badge on your blog, or by referring a friend and when they subscribe, letting us know.  

Thanks for stopping by,


Julie B

Thursday, October 27, 2016

Star Album with Coordinating Card & Tag!

This set of projects is a gift set, photo album and home décor piece for the holidays, all in one. The Star Album has seven unique decorated panels and seven spots for photos. The wide variety of stamps, materials and techniques used make it an extra special gift or home décor item. Some of the panels are simple and others have a lot of detail, but they are all finely crafted to pair with your treasured holiday pictures. The coordinating tag and card can be given separately or the whole ensemble can be given as a gift to one special recipient.

This awesome project was made by Melissa Kerman and you can get her tutorial when you subscribe to the month of October over at Craft Project Central.

Thanks for stopping by,


Julie B 

Monday, October 24, 2016

Butterfly Basics Painted Tote Set!

Learn how to get a double dose out of your photopolymer stamps by getting both a background and a detailed image from the same photopolymer stamp!  This Painted Tote Set includes a paint-stamped canvas tote, a set of matching tote notepapers and a beautiful tag for gift giving.  What a fun project to keep small hands stamping!  You can add additional gifts to the totes such as stamps, stamping or scrapbooking treats!  These totes make great gifts for the holidays and any special occasion!

This pretty project was made by Michelle Wecksler and you can get her tutorial when you subscribe to the month of October over at Craft Project Central.

Thanks for stopping by,


Julie B

Saturday, October 22, 2016

Paisleys & Poseys Card Set & Purse!

Paisleys are all the rage right now, and this card set will be perfect for all paisley-lovers! This set includes two different card designs, and three need to be made of each to fill the cute purse-box that goes with it. This project features the beautiful Petals & Paisleys Suite of products. Make one as a gift, and make another one for yourself. This would also make a great product-based class.

This fun project was made by Christy Fulk and you can get her tutorial when you subscribe to the month of October over at Craft Project Central.

Thanks for stopping by,


Julie B

Wednesday, October 19, 2016

Merriest Wishes Tags & Gift Box Set!

Gift packaging is something we need throughout the year, especially during the holidays!  This gift box is designed to include four individual compartments, just perfect for the Merriest Wishes gift tags.  The tutorial also includes four gift tag designs. The tags can be easily customized to your favorite colors, images, or greetings, from the Merriest Wishes/Merry Tags Bundle.  Just make four of each design and you will have sixteen beautiful tags to give to that special person this year.  Or, you can leave off the divider and fill the Gift Box with candies!  The Gift Box containing the candy uses Candy Cane Christmas and Candy Cane Lane Designer Series Paper.

This super pretty project was made by Jari Francis and you can get her tutorial when you subscribe to the month of October over at Craft Project Central.

Thanks for stopping by,


Julie B

Sunday, October 16, 2016

Boxes of Thoughts!

It’s time to start thinking about decorating for the holidays and here is a great project to help you get a jump start for your Thanksgiving and Christmas Décor.  This project will make the fun mantel piece for both as it is double sided.  Just turn it around after Thanksgiving is over and you are ready for Christmas!

This fun project was made by Twila Davis and you can get her tutorial when you subscribe to the month of October over at Craft Project Central.

Thanks for stopping by,


Julie B

Thursday, October 13, 2016

Kids DIY Christmas!


Children love to give gifts that they’ve made. How many of us have proudly worn a macaroni necklace created by one of our favorite children? This project will show you how to help your child create a gift that is useful and lasting. Best of all, children will learn a little about science and gardening. Fun and cheerful tags using the Here’s to Cheers bundle from the Stampin’ Up! 2016 Holiday Catalog complete the gifts, and they’re packaged in the 6” x 12” Gusseted Cellophane Bags. Use the leftover bags to create a cute wreath to hang on your front door. Children will be proud that they helped with décor and gift giving this season. This would make a fun class for older elementary or middle school children, or for children and parents.

This super fun project was made by Buffy Cooper and you can get her tutorial when you subscribe to the month of October over at Craft Project Central.

Thanks for stopping by,


Julie B 

Tuesday, October 11, 2016

A Birthday Fiesta!

Let’s have a Fiesta! In this tutorial, you will find six cards designed with the Birthday Fiesta Suite of stamps, framelits, Designer Series Paper, and Festive Embossing Folder- one of them is even a Christmas card! They are all tucked in a card box to give as a gift, too.  This tutorial would be great for demonstrators to use for a Product Class since it includes two fun fold cards.

This super fun project was made by Cindy Brumbaugh and you can get her tutorial when you subscribe to the month of October over at Craft Project Central.

Thanks for stopping by,


Julie B

Saturday, October 8, 2016

Thankful Gift Ensemble!

This project provides a plethora of ways to give thanks for the coming Thanksgiving Holiday, or for anytime you want to just be thankful! In this tutorial, you’ll learn how to quickly transform a Spiral Memo Pad into a Personal Thankful Journal. The Gift Bag Punch Board makes the coordinating Note Card Holder a snap to create, and just the right size to hold a plentiful stack of Note Cards to write all your thoughts and memories on. You’ll also make a simple, but trendy Tagged Mason Jar to hold all your thankful Note Cards. Be sure to include a Project Life Journaling Pen to write on the Note Cards that will fill the Jar. And, of course, the Thinking of You Card is the perfect partner to any or all of these projects for gift giving! 

This project was made by ME!! And you can get the tutorial when you subscribe to the month of October over at Craft Project Central.

Thanks for stopping by,


Julie B

Tuesday, October 4, 2016

Cookie Cutter Halloween for Class!


So here's a double Sneak Peek for stamp class this week! We'll be making both the card and the Nugget Sleeve Treat Holder - and both using the Cookie Cutter Halloween set!

They are both quick and simple - but oh, so cute for Halloween gift giving!

I hope you'll be coming to class this week to make these cuties, plus two other fun fall cards!


Julie B

"Basket of Wishes" Scraplings

There are several interpretations of “scraplings”, and in this tutorial a scrapling is a card (or tag or any other creation) that gets its start from a scrap of cardstock or paper . . . or both!  Although the cards in this tutorial get their start from full sizes of cardstock and are presented with exact measurements, the intention is that you will feel inspired to create cards and tags of all shapes and sizes from your stash of scraps.  When you need to create a quick card but the scraps all seem too small, think outside the box and use them to create a non-standard sized card.  The good news is that scraplings should fit any size (mailable) envelope that you have on hand, and the recipient will enjoy the odd size/shape of the card!  This tutorial includes instructions for making a pocket holder that has been custom-designed to perfectly hold the set of “scraplings”.  Another thing to love about this tutorial is that it features one set of designer paper and (mostly) one stamp set.

This super fun project was made by Regina Andari and you can get her tutorial when you subscribe to the month of October over at Craft Project Central.

Thanks for stopping by,


Julie B

Sunday, October 2, 2016

Creation Station Blog Hop - To Die For!


Welcome to Creation Station's Blog Hop for October! Our mission was to show you ways to use Framelits Dies in ways that aren't necessarily the straight forward, typical use - but maybe something a little out-of-the-box! So I paired the idea with some fun, Halloween ideas~


I used the Lots of Labels Framelits as my base for the project! - And I used it in a pretty typical way on the card front. But then, I also used it to create a little Hershey's Kiss treat holder...


On the card, I used the #5 Lots of Labels Framelit to create a spot for the Suite Sayings sentiment. I also used the Brick Wall TIEF for the background, a little Halloween Night Specialty DSP and some Pumpkin Pie Glimmer Paper for a little extra touch of somethin' somethin'... But the star of the card front is the Skeleton from the Cookie Cutter Halloween stamp set... 


He's simply stamped in Basic Black, with his little Pumpkin Pie bow tie - all punched so easily with the Cookie Cutter Builder Punch!


And my favorite part of the project is the Treat Holder (cuz everybody likes a little treat!). It's a die cut from #7 (the largest) Lots of Labels Framelit using Basic Black Cardstock. And it holds three Hershey Kisses~


Here's a quick tutorial - Place the 90 degree corner at 1-1/16" and score. Then turn 180 degrees and do the same from the other 1-1/16" corner. You'll end up with a 1" section in the middle.


On the middle section, I used Stampin' Dimensionals to adhere three Hershey Kisses! - Super easy! Fold up the sides, tie the top together, and add all the cute stuff on the front - tahdah!!


Hope you like my project! And I hope you enjoy the rest of the hop...


Thanks for stopping by,


Julie B
Saturday, October 1, 2016

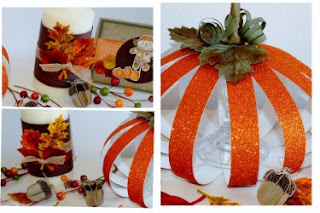
Fabulous Fall Centerpiece Ensemble!

Welcome autumn into your home with this Fabulous Fall Centerpiece! First you will learn how to create a glimmering pumpkin that is the perfect focal point for your table or mantle. Next you will make two coordinating candles that accent the pumpkin beautifully. A sprinkling of autumn leaves and 3-D acorns add just the right touch to your fall décor. And to top it off, there is a darling card that can be framed, given away or adapted to make name markers for your Thanksgiving table. This ensemble is simple to make and will add something special to your home this season!

This super cute project was made by Julie Warnick and you can get her tutorial when you subscribe to the month of October over at Craft Project Central.

Thanks for stopping by,


Julie B