Sunday, November 6, 2022

Creation Station - Fun & Fancy Folds!


Welcome to Just Julie B Stampin' and to our Creation Station Blog Hop for November! This month we are showing off Fun & Fancy Folds! I Love this theme - And Love creating a fun fold! And the fun fold I'm sharing with you today is a 'flat fun fold'. Maybe that sounds a little strange, but the folds in this card create double pockets on a card front.


The base of the card is a 4 1/4" x 5 1/2" Mossy Meadow Cardstock piece. and the Boughs of Holly Designer Series Paper is 5 1/4" x 11 3/4", scored at 1 3/4", 4 3/4" and 7 3/4". Then it is just creased into a "W" shape, and adhered down to create the two pockets on either side.
 

The pull out card on the left side was made to be a gift card holder pocket, It measures 4 1/8" x 4 1/4", scored at 1 1/4" for the fold up pocket. 
 

The right side has a simple 3 1/2" x 4 1/4" White Cardstock piece with a 1" x 4 1/4" strip glued to it, just for a little writing space!
 

And then I added a bunch of fun stuff for the front! The holly leaves are from the Holly Berry Dies, and then I added a Wonderful Snowflake on top of those. And the tag was made from the Very Best Trio punch, and stamped with the new Framed and Festive stamp set.


I Love how a few score lines can create some really fun folds that give a whole new vibe to creating a really great card! 


I hope you enjoyed your stop here, and can't wait to see what the fabulous Vicki Boucher has in store for us next! Click the link below to hop on over!

Vicki Boucher

Thanks for stopping by,


Julie B

Sunday, October 2, 2022

Creation Station Blog Hop - Tweets & Treats!

Welcome to Just Julie B Stampin! This month at Creation Station we're creating 3-D projects!! I Love making little projects and treats to share! And in my most recent card class I was trying to decide on a quick and cute treat to make for the ladies that came to craft with me! And this is what I came up with...


I've been with Stampin' Up! for close to 25 years, and for as far back as I can remember, we've been making cute packaging for wrapped Hershey's Nugget candies! And this is just another version of how we can 'cutsie' up those Hershey Nuggets!

I started off by wrapping the candies with 1" x 3" Designer Series Paper pieces. These are from the Black & White Designs. Then I stamped the letters from the Alphabest Stamp Set onto various "Halloween" colored cardstock scraps, and punched them out with the coordinating Best Label Punch - Love these letters with this awesome punch!!!

Then I slid them into a 'pretzel bag' - I've had these hanging around for a long time in my stash of crafting stuff. But I know you can still find them on Amazon and in craft stores. Then I adhered the sealed bags onto a tag.


And the tag might be my most favorite part!! :) I cut a piece of Basic Black Cardstock 2" x 5", and punched the ends with the new Very Best Trio Punch. I feel like this new punch is sort of a 'sleeper' item in the July-December catalog. - But it is so awesome!! You can make any sized tag and punch the ends to make it so fun and fancy!! - And it even has an awesome slot punch to further perfect your tag!! What more could you want?! 


I hope you enjoyed my simple and sweet project this month! And I hope you continue on the hop to see what the fabulous Mikaela has to show us!!


Thanks for stopping by,

Julie B

Sunday, September 4, 2022

Creation Station Blog Hop - Going for the Gold!


Welcome to Just Julie B Stampin'! This month at Creation Station we're "going for the GOLD!" And I have an elegant style card, with a unique fold, to share with you! I used the Heron Habitat Bundle - I am loving this set and the coordinating dies!  


I decided to use the Texture Chic Specialty Papers to kind of 'spruce up' the set and create a more elegant vibe. And that lead me to the coordinating color choices - Gray Granite, Evening Evergreen and Soft Succulent. - And of course, Gold Foil, for a real pop of sparkle and shine!

It might get missed, but the layer under the Heron is a piece of the Brushstroke Specialty Paper - it is a beautiful, soft and textured piece of paper that really adds to the card!!


The fold of the card starts with a basic 5 1/2" x 8 1/2" folded in half. And then the front flap is cut into (unequal) thirds, creating "the Kickstand Card" (this has been named by my Stampin' Bestie, Elizabeth Price). 

By adhering a 4" x 5 1/4" piece of the Texture Chic Specialty Paper to the two outer flaps, and leaving the middle flap loose on top, you get the 'Kickstand'!


With the gap left on the inside of the card, you also get a beautiful peek at the other side of the Designer Paper - Love that!!

I hope you enjoyed your stop by here today! And I can't wait to see what the awesome Barb Pfeffer has in store for us next! Click here -

Barb Pfeffer

Thanks for stopping by,

Julie B

Sunday, August 7, 2022

Creation Station Blog Hop - Anything Embossing!


Welcome to Just Julie B Stampin' - and welcome to the Creation Station Blog Hop for August! We are creating with 'anything embossing'! And my favorite (and easiest) way of embossing is dry embossing with our embossing folders. It just adds that needed bit of texture, and with very little effort.

So the card I made here was for a class I recently held, and I Love, Love, Love it! I used the Kindest Gnomes Bundle, and mostly the Gnomes Dies to create this fun card. And the Timber 3D Folder was a subtle, but perfect background for one of the layers.


I used the Sale-A-Bration designer series papers, Rings Of Love for the card front, and used that for my color palette. I highlighted Poppy Parade, Mint Macaron, White and Soft Suede, with Crumb Cake as an added neutral. - I love that our designer series papers guide the perfection of our color choices for cards!

And I know I haven't said it yet - but I LOVE these gnomes!!! There are just four dies that make this perfect little guy! So easy, and so adaptable for any occasion! And how cute are the little mushroom accent pieces too, right?!


I did finish the inside of the card, but kept it very simple! I've been doing this a lot lately - using just a 1/2" scrap piece to accent the inside with a piece of designer paper that matches the card front. So simple, makes it all come together, and uses up those little extra scraps - Win, Win, Win!

I hope you enjoyed your quick stop by! And hope you continue to hop onto the next stop, where Denita will wow us with her creation -


See you soon,

Julie B


Sunday, July 3, 2022

Creation Station Blog Hop - The Great Outdoors!


Welcome to Just Julie B Stampin'! And welcome to the Creation Station Blog Hop for the month of July - We are sharing creations from 'The Great Outdoors'! I'm sharing some outdoors from the forest! This is a fun fold card we made at my last class.

The Happier than Happy bundle was one of the first new Annual Catalog bundles that I was drawn to - it is so cute!! I love the animals and dies, but the designer papers even more!! Some awesome prints, some subtle and neutral papers that will coordinate with each other, but also so many awesome images that were begging to be cut out to use on a card! ;)

So this card focused on a bunch of those super cute and super sweet images to cut out!


The base of the card is an Accordion Fold Card. It starts out as a 5 1/2" x 11" and the is scored at 1 3/4", 3 1/2", 5 1/4" and 7". And the small 'bump out piece' is 3" x 6", scored at 3". It's pretty easy! And then all the fun is in decorating all the panels!


I used lots of the designer series papers because they all are so awesome together. But for the the front and inside panels I used a 2 3/4" die cut square Stylish Shape, and then added some die cut tree and tree trunk pieces plus all those hand cut pieces from the designer papers - a little bit of work, but all worth the time to cut out - they're so cute!


Here are all those super cute die cut pieces adhered to the front and inside panels!

I hope you enjoyed your stop by, and hope you'll continue on and see what the fabulous Yvonne Spikmans Van Bruggen has created for us! 
Click here to go forward -


Thanks for stopping by,

Julie B


Sunday, June 5, 2022

Creation Station Blog Hop - Inspired By Water!


Welcome to Just Julie B Stampin' and welcome to the Creation Blog Hop for the month of June! This month we are Inspired By Water!! So my take on this was some coastal inspiration. We have a second home on the coast and there is always something awesome to see that will inspire my creativity! On a recent walk, we saw this beautiful Blue Heron enjoying the view. The photo makes it look like he was far away, but he really was pretty close to us!


Anyhow, I couldn't wait to create a card with the new Heron Habitat Bundle after seeing him! I did my best to recreate the colors of the real-life one into my card. And I added lots of fresh White Cardstock layers to frame it!


I stamped the Heron in Gray Granite ink and then I added touches of Light Navy Blends onto his head and part of his wing. Then I used Light Gray Granite to blend out a little of the navy. I added some Pumpkin Pie Blending on his beak and legs too. I did add a little bit of green, Mint Macaron and Soft Succulent, for the grass pieces. Seems it just needed some green, not just all the dried brownish grass in real life! ;)


I added a few other fun touches. I love these new Heart Pearls! The milky white ones were subtle, and I feel like they accentuated the white sponged clouds on the dry embossed background.


And the card base was a 4" x 11" that was scored at 2" and 7 1/2" to create a little inside pocket - just for something different to hold a gift card!


I hope you enjoyed your stop here today! And I hope you keep on hopping because up next is the fabulous Elizabeth Price! I can't wait to see what she has created...


See ya soon,

Julie B

Sunday, April 3, 2022

Creation Station Blog Hop - Inspired by My Favorite!

Welcome to Just Julie B Stampin' - and welcome to the Creation Station Blog Hop for April! We are creating 'Our Favorites!' So my cards today were inspired by my favorite place or location! And my favorite place is our second home! It's in Cambria, CA and it's on the Pacific Ocean. We sit in our backyard and enjoy the crash of the waves all day long (when we're able to get away there) - it's the best thing ever!!


We sit and watch the waves crash a lot! It's such beautiful nature, and so relaxing!

So when I saw the the new Waves of the Oceans Suite - I knew I had to have it! And for the Blog Hop, I decided to create something simple and something that could be easily sent (mailable) for a simple, but great masculine card. I feel like we never have enough masculine cards. 


I made a Coastal Cabana version. It has a Coastal Cabana Foil die cut wave, over a fussy-cut Designer Series Paper piece. I love the look of the Designer Paper layered underneath the die cut piece - it's just a great focal point!

But also, there is some simple blending with brushes to create the contrast for the sky on Basic White Cardstock. And then the die cut white clouds and birds are set off so much better!


And here's the version with the Night of Navy accents! Again, so simple, but just a little different look! Instead of Coastal Cabana for the Blending, I used Balmy Blue for the ink. And again, it's just a simple but great, easy mailable card!

I hope you enjoyed your stop by today, and I can't wait to see what the super-talented Mikaela has in store for us!! Click below to hop there!


Thanks for stopping by, and see ya soon,

Julie B

Sunday, March 6, 2022

Creation Station Blog Hop - Rainbow Rearrange!


Welcome to Just Julie B Stampin'! This month at Creation Station we are Rearranging Rainbows!! And my rearranging consists of a color rearrange! I love the Rainbow of Happiness Bundle, and especially the Brilliant Rainbow Dies! So I had to use those for this challenge, along some other fun coordinating things.

I knew I was going to make a rainbow with a different color palette - and I'm a 'blue' girl so I knew that was the direction I would go!


Here's the card I made! I love it's unique-ness! :)

I used Night of Navy, Bermuda Bay, Coastal Cabana and Poole Party. And the stamping and accents were Pool Party (one of my favorites).


One thing that I haven't done in the past, but did on this card - I added Dimensionals on the top edge of some layers, but glue/Glue Dots on the bottom edge. That really creates some fun dimension in real life when you see/hold the card. Something I'll definitely do in the future!


And can I say - I LOVE these Amazing Thanks Dies?!! Who's with me on that? This 'thanks' just pops so fabulously!!


So I also paired the Basic Borders Dies, specifically the stitched clouds die, to set off these fun rainbow colors. Doesn't it just make a great partner?! 


And the sweet happy-faced sun! Even in Pool Party, it's just the cutest, right?! It's from the Annual Catalog set, Sharing Sunshine. And I added some White Baker's Twine and Iridescent Rhinestone Basic Jewels, they make everything prettier!

I hope you enjoyed your stop here! And I can't wait to see what Jeanna has in store for us next. Click below to continue on!


See ya soon,

Julie B

Sunday, February 6, 2022

Creation Station Hop - Sale-A-Bration Celebration!!


Welcome to Just Julie B Stampin'! This month for the Creation Station Hop we're having fun with the Sale-A-Bration freebies! I love that Stampin' Up! offers such awesome products to begin with, but then free products when we purchase $50 or more!! - Who can resist?!

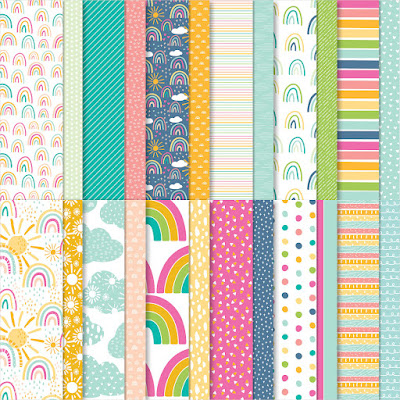
And here is one of the choices, and one of my favorites - you get 48 bright and 'oh so happy!' sheets of Sunshine & Rainbows Designer Series Papers -


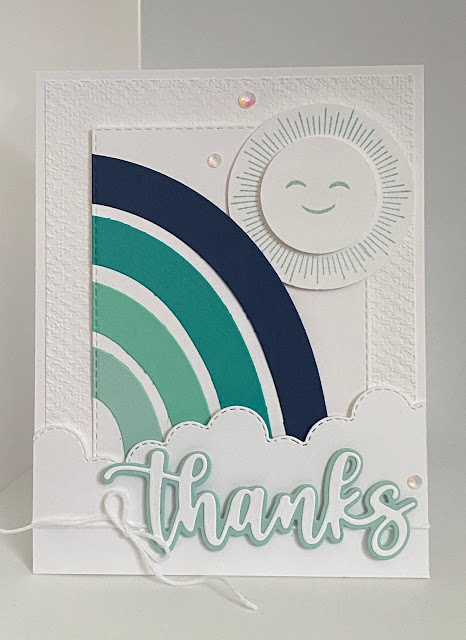
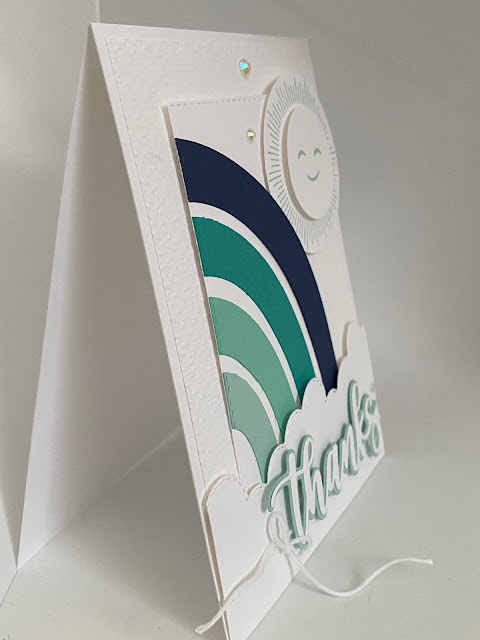
I Love to get a great set of Designer Series Papers - they can totally inspire me, and help to guide the cards I will make! So here is a card I made for my stamp class friends this month. It's pretty simple in design, but the inspiration definitely comes from this super fun Designer Series Paper piece.
 

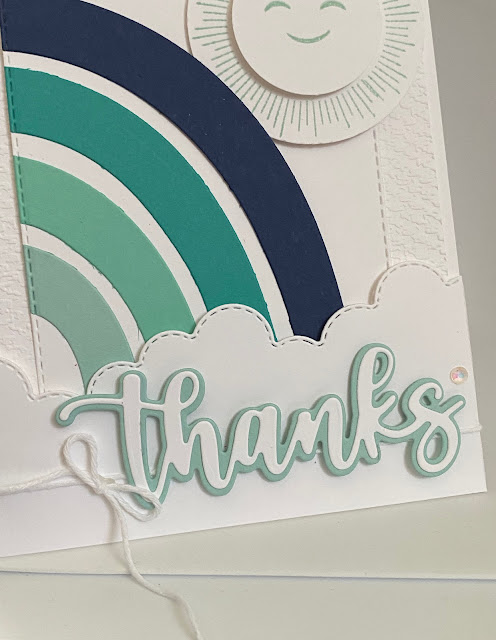
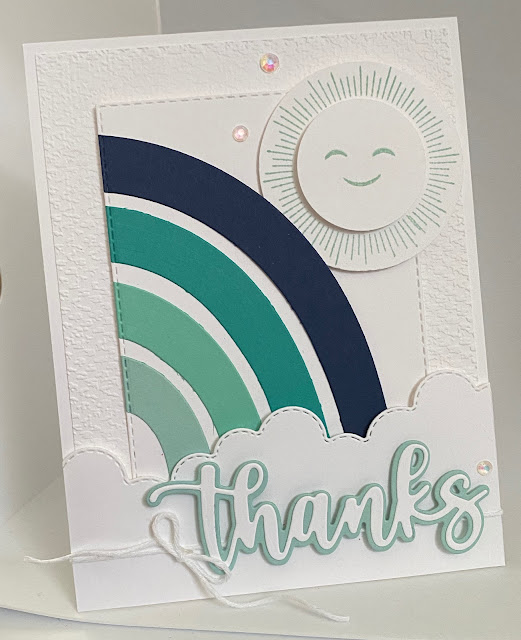
I used two layers of Stitched Rectangles to layer the coordinating rainbow die cuts onto. I thought that pop of Mango Melody on the larger Stitched Rectangle helped to pop the rest!

And I think my favorite part of this card is the cloud layer under the die cut rainbow. I created the cloud layer by first cutting a Stitched Rectangle from Basic White Cardstock. Then I used the Basic Borders Dies 'Cloud' piece to cut down the rectangle piece. How cute is that layered over the rainbow pieces?!!

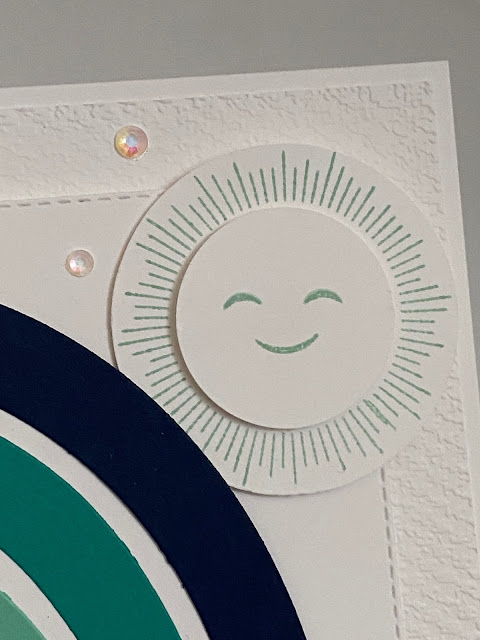
And can you see the Artistry Blooms Sequins on a couple of the sun centers on the Designer Paper?! 


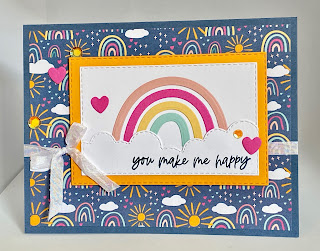
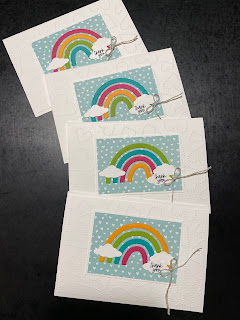
Here is another card - and I used a subtle piece from the same Sunshine & Rainbows Designer Series Papers for the background. I Love this print in Pool Party with cute little hearts all over it! These are smaller, notecard sized cards. And I made a stack of them, pretty quick and easy! 

There are a couple of layers. One with the Dotty Hearts Embossing Folder on Basic White Cardstock. Then a narrow Basic White Cardstock layer under the designer paper layer.

And on this card, and the previous one, I used the coordinating Rainbow of Happiness Bundle. The dies are so fun and addictive to use!! (And when you purchase that bundle, you're so close to earning the designer papers...)


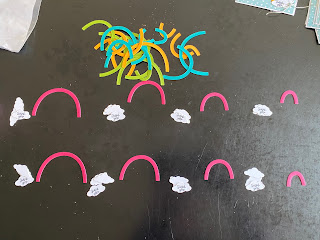
Here's a little glimpse into my method of madness in creating!! I die cut the rainbow from the four colors. and then I had four sets of rainbows! 


So I made four cards!! Notice, they all have the colors in a different order? But they're all rainbows, and still pretty cute! And that was good to get four sets - because you can always use more thank you cards, right?!

I hope you enjoyed your stop here, and hope you're looking forward to seeing what Kathy Kartak has in store for us - I know I am!! Click Here -


Thanks for stopping by,


Julie B