Friday, October 30, 2009

Pumpkin for any Occasion


Wow, I don't where the last week, or so!?, has gone!! Anyway, I'm back! I've been doing lots of stamping - just haven't been on the computer to share - sorry! I'll catch up though. I have some cool class ideas that I'll be showing you soon too!


So, this card is the easy-to-make pumpkin, using three wide oval punches. I used the leaf from the Autumn Days set - lovin' that set! The Give Thanks stamp is from the Holiday Best Hostess set. My favorite part of the card is the background that's all "shimmery!" It's a new technique that we'll be doing at the next class - on Friday, November 6th.


I tried to take a close-up picture here to show the shimmery look - it's done with the Shimmer Paint in the Holiday Mini catalog. I'm totally addicted to this new shimmery look - It makes me think of our Shimmery White Cardstock, but you can do it on anything!!


You'll have to come on Friday and see how to make it!!


Have a Happy Halloween!


Happy Stamping,


Julie


Monday, October 19, 2009

Halloween Criss Cross Box


I made another quick Halloween treat this morning. Remember our good old pattern the Criss Cross Box (check your technique ring!)? This is it with a Halloween twist! I used the Cast-A-Spell designer series papers and the set Grateful Greetings from the Holiday Mini Catalog. I also used the small and large tag punches. And, for the "Goblin Greetings" tag, I used the Wide Oval punch and two overlapped Scalloped Circle Punches behind it (remember that trick too?!).


Hope you have a good Monday!


Julie


Thursday, October 15, 2009

Ornament Acorns!


Here's another way to use the Ornament Punch that's from the Holiday Mini Catalog. Not that the original, with it's coordinating stamp set, isn't already totally cool and awesome! But, here's how to make the ornament into an acorn. I used Kraft and Chocolate Chip cardstocks along with Chocolate Chip Designer Series Patterned Paper. I also used the Grateful Greetings Stamp Set from the Holiday Mini - LOVE the sayings, and especially the fonts! So now your ornments can be used for Fall and Thanksgiving!


Oh, and I did use other punches - the Scalloped Edge for the acorn "cap," the Large Oval and Scalloped Oval for the saying, and the Five Petal Flower for the leaves (I think I use that punch for leaves more than I do for flowers - but it also makes a cool pointsettia for Christmas!)


Thanks for stopping by,


Julie

Monday, October 12, 2009

Ornament Punch Versatility


This is one of the cards we made at our last Technique Class. We did "Foil Paper Resist." Using the Bride Specialty Paper, we brayered Old Olive ink over it and the scroll design resisted the ink leaving it white! Pretty cool, and you can do this with any Classic Ink Color to make a super cool background. Also, the Bride Paper has a striped paper that you can do this on too!


But, what I really wanted to show you was the Ornament! Notice the ornament is perfectly "cut out;" Well, it's not really cut out, it's the Ornament Punch! And, I saw some cool ideas with the punch that I thought I'd share...


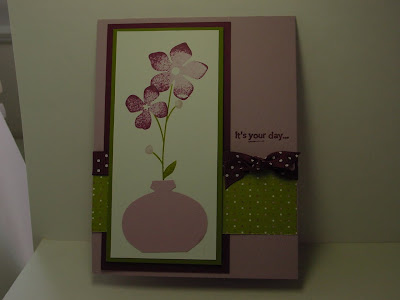
I made this card (sorry the picture is so dark!) using the Ornament Punch, but just trimming off the bottom edge. So, it creates a little vase for flowers! The sets I used for the card are For All You Do and Birthday Greetings. And I used papers from the Cottage Wall Designer Series Papers.


I have another versatile idea for the Ornament Punch, but I'll save it for another day!!


Have a Happy Monday,


Julie


Wednesday, October 7, 2009

The Very Versatile Pumpkin Patch Set!


So, remember a while back I posted this card with the Holiday Mini set, Pumpkin Patch? Well, on Jill Hilliard's blog (she's a great stamper!), I saw how she showed the versatility of this set! And, of course, I decided to copy with a few of my own tweaks in colors and layout, so I could share the idea with you!


So, here's the set using the "pumpkins" as Christmas ornaments, and all glittered up (probably hard to see from the picture). Then I added the Merry Christmas from the Teeny Tiny Wishes set.


And this next one uses the "pumpkins" as birthday balloons. Also, the curly ribbon on the bottom of the balloons is the curly "twig" from the set, but the strings were just drawn in. And, again, I used the Teeny Tiny Wishes set for the happy birthday saying.


And, finally the "pumpkins" are now turned into flower centers! With circle punches and some hand trimmed stems, they became flowers. The leaves were made from the Five petal flower punch (which is on the Deal of the Week until Monday morning!). And, of course, the Teeny Tiny Wishes set once again!


At first I wasn't sure about ordering this "Halloween" set from the Mini Catalog, but now I'm super glad I did! What a versatile set it turns out to be!!


Thanks for stopping by,


Julie


Monday, October 5, 2009

How Cute is Candy Corn?!


Today I was checking out some blogs as usual (I know you must think I'm always just checking out other people's blogs - but I do once in a while stop to CASE their creations!) Anyway, this little cutie came from a lady who's my sideline (we're both under the same upline - Tami Waddell), named Pennie McCallum. She's an awesome stamper!


It's our good ol' Triangle Box Pattern (if you've been coming toTechnique Class for a while you should have this on your ring). You take a 3" x 6" piece of cardstock and find the center on all four sides. On the 6" side just create a score line and fold in half. But on the 3" sides, find the center and then connect it with the center of the 6" side (creating a triangle on each half). Then fold in the score lines and "smoosh" it all together to make a triangle box. Clear as mud?! If you need help, email me at julieb30@hotmail.com.


Here's the other big difference though. Instead of using just a 3" x 6" piece of Whisper White cardstock, layer pieces to make it look like the colors of Candy Corn. Use two 1" x 3" pieces of Yo Yo Yellow and one 2" x 3" piece of Only Orange cardstock. Layer them onto the 3" x 6" piece of Whisper White Cardstock as shown above which will give you the Candy Corn look!
Of course, you have to fill it with sonme Candy Corn before giving it to someone!


Hope you had a good Monday,


Julie


Sunday, October 4, 2009

Wide Oval Pumpkin Tote

Fall is definitely in the air!! It's cool in the morning and the evening, and the evening is getting dark so early now! Seems like it happens so fast. But with the coming of Fall, I always feel excited about the Holidays coming too!


I found a cute little idea surfing some blogs this weekend. I like it because it's so little! It doesn't give a lot of room for treats, but thought it would be part of a cute little place setting idea for the Thanksgiving table (or you could even change up the front for a cute little Halloween treat too!).


Here's a photo of all the parts before I put it together. The pumpkin made from five (ten altogether, for the front and back of the tote) Wide Oval punches from Pumpkin Pie Cardstock. I sponged the edges of each one. The handle is a 1/2" x 6" piece of Pumpkin Pie. The box base is a 2 1/4" x 5 3/4" piece of cardstock. It's scored at 1 3/4", 2 3/4", 4 1/2", and 5 1/2". Than along the bottom it's scored at 1". I stamped a couple leaves from the Autumn Harvest set onto Old Olive cardstock. And I made the stems (one for the front and one for the back) from a scrap of Old Olive.


I hope you're having a great weekend! Thanks for stopping by,


Julie


Thursday, October 1, 2009

Sneak Peek for Friday's Class


This is one of the cards we'll be making tomorrow at the First Friday Technique Class. We will use the Finial Press Embossing Folder with a slim wooden frame underneath it to emboss the texture on the Sage Shadow cardstock piece. A blank frame magically appears in the center! Then it is lightly rubbed direct with a White Craft pad. I think that helps to highlight the raised images. Then we add some layers - Whisper White and Basic Gray. And, of course, stamp the saying in the middle. Love that saying from the All Holidays set!


And, the little accent is a flower from the Pretties Kit with a half pearl center. I made the sage "leaves" from a couple smidges of Sage grosgrain looped around and adhered with a Mini Glue Dot. Without the Mini Glue Dots, this part would have been torturous!!


Hope to see you tomorrow at class!


Thanks for stopping by,


Julie