Monday, April 11, 2011

Butterfly Simplicity


I wanted to create a simple card today, and I've had a sketch in mind that I wanted to follow from Create with Connie and Mary. I knew it was a clean and simple sketch - and that's exactly what I needed today! But you know how you just have those days where maybe you even set yourself up for having a tough day - I think that's the kind of day I'm having. I've done and re-done every part of this card, at least twice!! ...Well, hopefully the day can only get better, huh?

Anyway... I used the Butterfly Prints set! I haven't taken it out much since I got it, so I figured it was time! :) I also used Concord Crush, which I don't use much, but I love it!! And the background is embossed with the Vintage Wallpaper folder.


Here's the sketch I followed! - Love the simplicity of it! And I love that the Create with Connie and Mary Challenges are also Stampin' Up! only supplies.


Here's a close-up of the butterfly - I love how the three butterfly choices in this set all coordinate with the Butterfly punch (one less re-do for me when I don't have to cut out the image!). And even though the set has a butterfly body, I decided to use linen thread and a rhinestone for its body and antennae - just thought it added a little more dimension!

Thanks for stopping by and I hope you have a good Monday!


Julie

Sunday, April 10, 2011

Pretty Postage Sneak Peek!


Today I thought I'd share a Sneak Peek of some new Summer Mini stuff (coming out in May). I participate in a swap with my upline and some sidelines, where we each pick a new set and then design four cards, and duplicate that set for each of us in the group. It's a great deal, because then we each have four cards with new sets to show off when the new Mini comes out!

So my set is the new Pretty Postage set, which also has a coordinating new punch - love new punches!! So I'm glad I got it! It has four stamps in it, so I'll design one card for each stamp - kinda easy, except that that as I started creating yesterday, I realized hummm... what to do with such small images!! I have to do a lot of other creating around the small images!


I started with this cute little 24-7 stamp in Blushing Bride. It's stamped and cut and layered, and backed with the new Postage Stamp Punch. I also scrunched some Blushing Bride Stitched Poly ribbon under it, and added a linen thread bow.


It kind of needed something to fill a little more space so I added a "Word Window" of a friend, punched from a piece like the background. I sponged it and highlighted the letters with Smooch Top Coat. And it shows way better in person!


Here's another picture of the background, where maybe you can see the Texturz plate was used on the white. I also added some Crumb Cake brads because it still needed a little space filler on that side!

And the whole thing was put on a Polka Dotted Embossed card base!


Have a great Sunday,


Julie

Saturday, April 9, 2011

An Easter Blossom Thank You


I needed a thank you note for a friend today, but as I started it I couldn't decide how to lay it out. So as I was surfing around, I found a great Sketch Challenge to follow from Stamping 411.


I love that their Challenges are all Stampin' Up! only now! It just means that when you check out all the entries there will only be Stampin' Up! materials used. Anyone can still join, just use your Stampin' Up! stuff.


Here I added a white flower button, and I was happy that not only it's a cute little flower like the Sketch suggested, but also it matched the Easter Blossom stamp I used! Hopefully you can see the Shimmer on the background of the card here too! I told you, I still can't stop Shimmering... (It just keeps "needing" it!)


And here I hope you can see the detail on the stamping of the blossom branch, where I used Pear Pizzazz on the edges of the branches and (maybe you can see) the centers of the blossoms. Then I also used Smooch Top Coat over the Pear centers of the blossoms. Probably all that is seen much better in person!

I also used the Elegant Bouquet embossing folder for the background. Just by the nature of the folder itself, it only embosses part of the cardstock, which also fit with the original Sketch! Pretty cool!


Have a great weekend! Thanks for stopping by,


Julie

Friday, April 8, 2011

Happy Little Lollipop Flowers!


I decided to play along with the Pals Paper Arts Challenge today. The Challenge was to use Daffodil Delight, Crumb Cake and Pear Pizzazz. I had been thinking about making a card with the lollipop flowers for a while. So I figured I'd try one with these colors! I used lots of circle punches and just layered away!! I did add in Very Vanilla and So Saffron, but I also sponged the edges of those with Daffodil Delight just to keep the focus on Daffodil Delight.


Here's a close-up of the flower with the tag (seems like the larger picture didn't show it too well). I used the Tiny Tags set and the Jewelry tag punch for the little hello. For the flower stems, I just cut skinny strips; and for the leaves I used the 5 Petal Flower punch - just trimmed off a petal each for a leaf.

And probably you can see the Shimmer Spray on the polka dotted background... I just can't stop Shimmering!!!


Have a Happy Friday!


Julie

Thursday, April 7, 2011

I Just Had to Do it!!


I HAD to make one of these cute little Cupcake cards! I've seen a few, but then I saw this one made by Heather Summers, with quick directions. So I changed up a few things and made one!


Of course I had to Shimmer Spray, and add some Smooch Top Coat to the "frosting top." I did run it through the Big Shot with the Perfect Details Texturz Plate.

I also added a little stem to the Glimmer Paper Cherry on top. I just used the Oval punches to create it, but you could even hand-cut one (imagine that?!).


And here's the inside. It's not the prettiest, but at least with the Petal Cone die - you can get an easy-open card! It is pretty little, like 3" x 3 1/2", but it is so cute! It would be great in a cello envelope!


Thanks for stopping by,


Julie

Wednesday, April 6, 2011

Don'tcha Just Love it...?


...How easy the Big Shot makes giving little projects? I certainly do!! I wanted to make a bunch of quick thank you's. So I took out the Candy Wrapper die, that I hadn't used in a while! (Even though it's not shown in the current catalog, it is still for sale. - It's on the Carryover List of Holiday Mini Products that are still for sale.)

After running the Springtime Vintage paper through the Big Shot, it's just crease and fold, and Wah Lah!! Put your treats in and tie it up - Tah Dah!

I did add a little tag front with a stamp from the Hodgepodge Happiness set. I love this little set. I got it for a freebie during Sale-a-bration! I hadn't really thought I wanted it before, but it has some great little sayings in it, and I love that they coordinate with punches!! I used the Designer Label punch on it, and then backed it with a 1 3/8" circle to highlight the Not Quite Navy ink I used.


Simple and fun - gotta Love it!


Thanks for stopping by,


Julie

Tuesday, April 5, 2011

Paisley Petals "Gift Box"


This is kind of a re-make of a Gift Card Holder I made last year. I don't even remember where I got the original idea, but I've seen lots of versions of it since then!

My version is with the new Paisley Petals papers that you can get this month only (and then again when the new catalog comes out in July). I also used the Beautiful Butterflies Big Shot die and dry embossed the butterfly! And I love the little banner you can easily cut with the Petal Cone die - I stamped the 'for you' from the Say it Simply set in the Occasions Mini (I think I've definitely gotten my money's worth out of that set - for you and thanks for $7.95! Awesome deal!). And the "bow" is made with the oval punches, then I added a button from the Sew Suite set of buttons.


Anyway, my original was a card, but I wanted to make it 3-D so that I could put some treats inside. That was an easy fix - I just scored the 4 1/4" x 11" cardstock at 4 3/4" from each end. Then that created a little center area to fit a cello baggie of treats into - then I stapled them in!


Hope you have a great day! Thanks for stopping by,


Julie


Monday, April 4, 2011

Sweet and Sour Sparkliness!


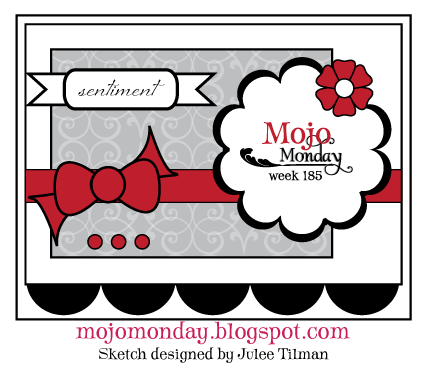
I made this card for the Mojo Monday 185 Challenge today. I Love having a Sketch layout to follow!! It really does help guide me in putting the parts together. I know I can always find inspiration from the Catalog and Idea Book, or lots of other places for that matter, but a Sketch Challenge is just fun!!

I have had the Sweet and Sour Specialty papers for a while - and I've been dying to put something together with them! So this was it!!


And here's the Sketch today - a lot of components to it, but all good!!


All very bright and fun, and I used only one stamp - thanks, from the Say it Simply set in the Mini Catalog. Of course, I added lots of Shimmer Spray to different layers, and lots of Rhinestone bling! What would my cards be without the Shimmer Spray and bling over the last "almost year" now??


And I used the Beautiful Wings Embosslit for the butterflies. I haven't had those out in a while, but it seemed like a great Springlike day for butterflies today!


Happy Monday to you,


Julie

Sunday, April 3, 2011

A Plum Perfect Paned Pendant!


How's that for some awesome Stampin' Up! alliteration??! Anyway... today I was thinking about what to do with all the large sized Beveled Windowpanes I have. We used almost all of the small and medium sized ones for cards in our last class. And now I have a bunch of just large ones!


I had seen a few people making necklaces from them. So I thought I'd give it a try. And it was pretty easy! I stamped with the Clearly for You set, and sponged and colored a 1 1/2" x 2" piece of Naturals cardstock (how's that for using scraps!?). I also added a couple other scraps of torn cardstock and the little {love} stamp from Tiny Tags.


Here's a little closer look. And then I put a couple scraps of Vanilla Satin through the side slits, and used Crystal Effects as my glue to stick the cardstock to the back of the Windowpane.

Then I attached a scrap of Vanilla Taffeta for the "loop" at the top, and attached a coordinated stamped back.


Here's the back. You never know when your necklace will do a "flop" on you - and who wants to see glue and scraps and stuff!?!

You can also see how I attached an Antique brad and kinda folded in the scratchy edges of it.


And here's where I got my inspiration - it was the necklace we made at Stampin' Up!'s Leadership Conference back in January. I Love this!! It's my colors and everything!! But I figured I'd try it in a little different look for the Windowpanes.


Even the back is a CASE! The advantage of having done it in the Simply Adorned Charm is that you can open it up and change it out, which is very cool. But I like that the Windowpanes can give you a similar look for a less price, especially if you wanted to make a bunch for gifts! (The Windowpanes are currently offered in the Occasions Mini Catalog for 12 for $7.95.)


Hope you're having a great weekend! Thanks for stopping by,


Julie


Friday, April 1, 2011

Nature Walk Awesomeness!!


This beautiful set of frames was made by my "Guest Designer," and one of my downline, Joanne Kiesewetter. She has made some really awesome cards and projects - and she really spends a lot of time and attention to the details (if only I could show you and tell you about all her work!).


Here's the close-up of the images. She used the Nature Walk set. If you look close she used the "no. 147" stamp, but masked it, and used the stamp-a-majig to make it just "no. 7." A nice detail, especially when the other frame has the full "no. 147." - Like I said, she spends a lot of time and attention to the details. For the background part, she used the acrylic block direct to the stamp pad.

And the Window Panes... How awesome is that how she accented the bird (and the egg below) with them?!


So here's the coordinating frame she made with the eggs stamp. I Love the colors she chose - of course, my favorites!


Here's the close-up of this one to show the Window Pane accent too! I just love these!! The frames she choose, along with all the details, it all just goes together so well! I told her she should be making these and selling them - even in a high-end boutique!


Thanks, Joanne, for sharing your work (and allowing me to share it on my blog)! She doesn't have a blog - but maybe she will soon! :)


Thanks for stopping by,


Julie