Wednesday, December 30, 2009

Christmas came and went!!


I hope you had a wonderful Christmas! It sure comes and goes quicker every year!! So, here is the Christmas card I made this year. I used Dasher - gotta love him! - and the Grateful Greetings set from the Holiday Mini catalog. I also used the Snowflake print window sheets along the bottom from the Holiday Mini Catalog. By the way, the Holiday Mini Catalog is ending on January 4th. And we have some great new stuff coming out after that! One is the punch along the edge of this card - it's a FREEBIE that you can earn in the Sale-A-Bration sale htat starts January 5th! I love the delicacy of the new punch, and it goes with a lot!


Also, I used Bordering Blue, Soft Suede and Kraft cardstocks for the card. I love these colors together. You can't tell from the picture, but I also sprayed the card and Dasher with Shimmer spray. In real life it gives a nice added touch! And, by the way, the Shimmer Paints were so popular that Stampin' Up! is continuimg them through the next Ocassions Mini Catalog period! So you can keep on ordering them - They'll make for some beautiful Shimmery Valentines!!


Hope you are enjoying the holidays, and thanks for stopping by,


Julie

Monday, December 14, 2009

Happy Birthday a little late!


Well, I did finally get my Christmas card decided on - and I've been working madly on all the steps to factory-line produce and assemble them. I do really love the process of it all - just the hardest part is making the decision that "this is it!" It seems there's always that "maybe I could do... or maybe I should add.." But there always comes that point where you need to just be happy with it. You set it down, come back to it in a bit, and look again - and then "yep, I like it!" Anyway, I'll post it soon...


But I have posted a card I made for my nephew, whose birthday was in November. And, yes, I finally mailed the card a week ago - more than a week late!! You know how these things are NOT a surprise, but somehow they creep up on you and then pass you by?! Anyway, late, but not forgotten!!


So the card is made with a Kraft base, and I used the new Polka dot Impressions folder (available in January!). Then, with the Thoroughly Modern Designer Series Papers I layered Bermuda Bay, Soft Suede, Kraft and White layers. I used the Good ol' Holiday Blitz set for the present and the Birthday Greetings set. I often go back to this layout for cards because I like the clean look to it!


Thanks for stopping by!


Julie


Tuesday, December 8, 2009

Christmas and a Sneak Peek!


So, here I am still figuring out what my Christmas cards will be this year!!? I put together lots of designs for classes and see a lot of great ideas online, but I always have to make mine a little bit different. So I'm always tweaking things around till the last minute (and past!!). Since I bought some of the new Occasions sets that will be released in January, I was looking online at what others were doing with their sets, and I found a similar idea with the new I {Heart} Hearts set. I liked how the heart was used with love, but then ADDING Christmas to it. Anyway, not sure I'll remake this one for a big bunch, but I do think it's pretty cute.


Here are the details - the holly is from the Christmas Classics set; it's stamped out twice and cut out separately, olive and red. Both of the hearts are from the I {Heart} Hearts set. And, the little one is punched out with one of the new punches! The "Christmas" word comes from the Fundamental Phrases set, and is punched out with the Word Window punch. There are lots of layers, but one of my new favorite things is on the base of the card - it's a new Embossing Folder!! It's called Perfect Polka Dots - and they're perfect alright! Love them!


There are a few more steps and punches, but you could probably figure them out - I think this won't be my Christmas card this year, only because it will be too time-consuming to re-create for bunches of them, but I still like it.


Can't wait to share more details of what's coming in January, but for now I better keep focus on Christmas card completion!!


Thanks for stopping by,


Julie


Wednesday, December 2, 2009

Sneak Peek for Friday's Class!


So here's a little Sneak Peek for one of the projects we're making this Friday at Technique Class. It's a little Cocoa Cup (or tea cup, or coffee cup, or whatever kinda cup you want it to be!). I saw a template on the Stampin' Up! website a while back - and realized Nah! Don't want to download, photocopy, trace, cut out and score the pattern. Way too much work for me!! Then, I finally looked a little closer and realized it would be an easy one to create with just a few score lines on the Fiskars cutter! So, here it is... and on Friday you'll be making one (with all the little goodies inside!), and you'll see how easy it is! (Otherwise, I may post the directions later.)


Off to get the other cards ready for Friday.


Hope to see you then~


Happy Stampin'


Julie

Thursday, November 26, 2009

Happy Thanksgiving!


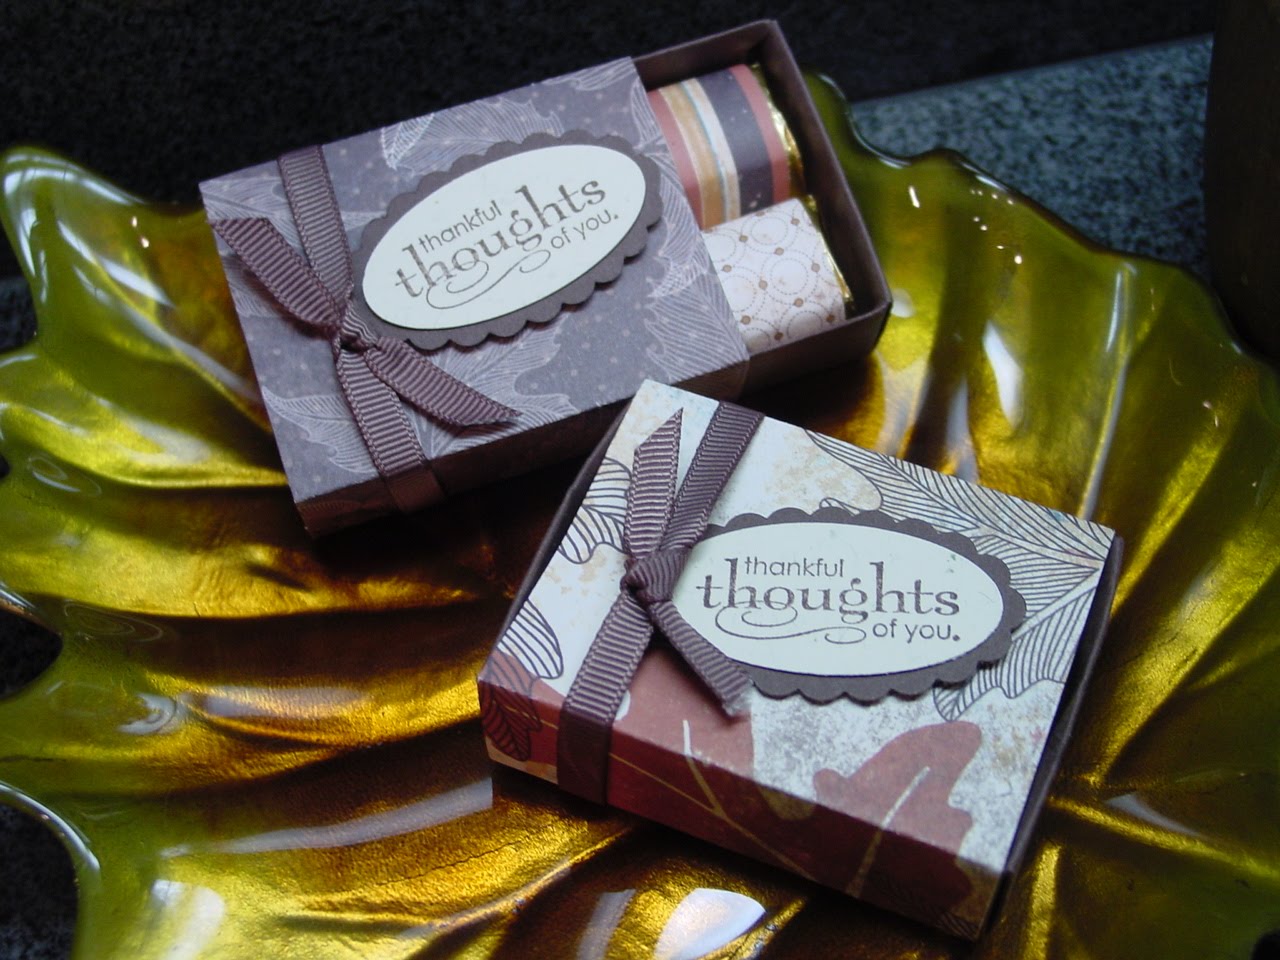
Wow! This picture definitely came out different than it looks in real life! But with about 15 minutes left of Thanksgiving, I'd thought I'd pass a long a Happy Thanksgiving to you!! These were little matchboxes, punched out from the Big Shot in Chocolate Chhip and the Autumn papers from the Holiday Mini. Then I stamped the saying from the Grateful Greetings set, also from the Holiday Mini, punched them with the large oval and then a Chocolate CHip Scalloped Oval to layer it on, tied with a chocolate chip Grosgrain ribbon - and wahlah! Oh ya, the most important part was the nuggets wrapped inside; you can see them peeking out of one of the boxes!


The best part of these was that my 2 1/2 year old nephew used almost all 15 of them to make a race track and then a garage for his hot wheels all across the dinner table! The memories of Thanksgiving and family....
Hope you had a wonderful Thanksgiving!
Julie

Sunday, November 22, 2009

Cute Little Rudolf!

I've seen so many cute little things made with the Stampin' Up! punches lately - and I'm lovin' them A Lot! I used some Big Shot parts for this one along with punches. From the versions of "Rudolphs" I've seen, there are a few different dies/punches for the antlers. But I had the Swirls Scribbles Sizzlet die that seemed to fit just right for the antlers. Then for his head is the Wide Oval punch; his "bangs" are a piece of the largest flower of the Boho Blossoms punch; his eyes are 1/4" circles and his nose is a 1/2" circle.


The white gel pen was used for highlighting his eyes and nose. I put him on a Top Note Chipboard piece that I had sitting on my desk since forever!! (I had bought the chipboard and wanted to try it in the Big Shot, but then never had a reason to use it for anything.) On the Top Note I stamped white Snowflakes, from the Holiday Blitz set, sprayed with Shimmer, and Sponged with Chocolate Chip ink. Then I added the Merry Christmas saying from the Teeny Tiny Wishes set on a Word Window Punch and a Modern Label Punch - Love those Punches!!


I hope to make some more tags that I will actually use this year - seems like there are never enough when you are finally ready to wrap all the gifts!


Thanks for stopping by,


Julie


Friday, November 20, 2009

Funny Little Punch out Turkey!


I found this cute little turkey nugget made out of punches, so I decided to make one. Probably my camera, or maybe it was just that second glass of wine I had, but he really does look better in person! His body starts out with a nugget candy wrapped in Designer Series Paper. Then attached to his back half are three scallop circles (trimmed between Feathers, or scallops) to make his tail feathers.


Then his front half is a 1 3/8" circle for the body, a 3/4" circle for the head, one scallop from a scallop circle for his beak, a "graduated scallop circle piece for his "gobbler", and two prongs of a Snowflake for his feet. Then his eyes are are just drawn with a black marker.


I think they'll make a cute little place setting for the Thanksgiving table!


Have a great weekend,


Julie

Thursday, November 12, 2009

Christmas is Coming!!

Next Friday, November 20th at either 10am or 6pm, I'm having a Christmas Card-Making class. We'll be making cards in sets of 4's, and the minimum number of cards to make is 20! So we'll be making a stack!! But I'm trying it this way this year to offer a little more choice - so, if you want to make 20 of all one style you can, or you can make any groupings of 4's of whichever ones you want - 8 of one, 12 of another, or whatever... So, for 20 cards it is the Holiday Gift price of $25!! And, if you'd like to make more than that, it is $5 for each additional group of 4. The price also includes envelopes - You just need to show up, and I'll have everything cut and ready to go for you!


So, here are the card choices I'm offering:


If you're interested in coming over and stamping Christmas cards, drop me an email and let me know your choices. I'm asking for RSVP's by tomorrow, Friday the 13th, so that I will have enough time to order and prep everything.


If you're interested in making cards, but can't make the date, I can make your kit a "Take Home Kit," and you can make the cards whenever you have time! Just drop me an email and we can figure out the specifics.


Thanks for dropping by,


And Happy Stamping!


Julie


Monday, November 9, 2009

Thankful For my Big Shot!


I decided to make a Thankful Banner for my fireplace mantle for Thanksgiving. And, yes, I was thankful for my Big Shot!! I used the Pennant Die and the Serif Letter Dies - and Wow! Thankful has eight letters! Doesn't seem like a lot, but it feels like a lot of turns of the Big Shot handle when you want some nice layers! But, no complaining here, I wouldn't be making a banner without the Big Shot!


Here's a close-up of the "A" just to see some of the detail. I used the scrap edges of the second layers to trim and make scallop edges under the Designer Series Paper accent pieces. By the way, the Designer Series Paper is the Autumn Meadows from the Holiday Mini Catalog. Once again, the Designer Series Papers helped me coordinate all the colors! And, I did add some Champagne Mist Shimmer Paint - sprayed on! - although the picture doesn't really show it.


Hope you have a good week!


Thanks for stopping by,


Julie


Tuesday, November 3, 2009

Another Shimmery Fall Card!


I saw this card, a bit different, on Andrea Walford's blog, and decided to CASE it! I think the message, from the stamp set Hope Happens, hits home!! I haven't been real excited about the Autumn Meadows Designer Series Papers, but I guess now that it's been feeling a little more like Fall - and Halloween is over - I'm kinda liking these papers more.


I made the card 5 1/2" square. And, I used layers of Chocolate Chip, Really Rust and Ivory Naturals Cardstocks. The leaves are made from the Big Shot die Leaves 2, and are Chocolate Chip, Really Rust and More Mustard. I also added a Chocolate Chip Corduroy Button with some Linen thread.


Here's a close-up of the base of the card in Chocolate Chip, and it's sprayed with my new Favorite technique Spray-On Shimmer! I used the Champagne Mist Shimmer Paint for this one. I liked how the tones of the Champagne color went better with the browns of the card. I think you definitely see it better in real life!


Here'e one of the leaves up close too. Also notice the "veins" of the leaf? I did that by just setting the leaf on the spongy mat that comes in the Mat pack and drawing them with a stylus tool - kinda fun detail!


Hope you are having a good week so far! I hope you'll be at the Technique Class this Friday; I can't wait to show you all how to "Shimmer!!""


Thanks for stopping by,


Julie