Monday, May 30, 2011

Flower Fest for Friday!


Here's one of the cards we'll be making this Friday at class! I guess I've been on a kick with the Sweet and Sour Specialty papers - I think because they're so bright and happy! And with this on again - off again Spring/Summer weather, these papers keep brightening my mood!

The card is made with a Gate Fold opening; I've seen a couple versions of the Gate Fold, but this is definitely one of the easiest!


And here's how it looks when it's opened - Kind of a fun something different than the usual side-to-side or top-to-bottom opening!


And here's a closer look at all the cool-ness added to the front of the card! We'll be using the Happy Greetings set, and the Flower Fest set (I'm really lovin' how easy to use the Flower Fest set is - with coordinating punches!).


I hope to see you this Friday at class! I have some other super cool stuff to share - I can hardly wait to show you the Scrapbooking project we'll be making!! Yep, me who doesn't scrapbook has already finished the sample project - and it even has PICTURES in it!! I'm so excited, there may even have to be a Sneak Peek of it in the next day or so... Stayed tuned!!


Hope you've had a wonderful Memorial weekend!


Julie


Saturday, May 28, 2011

Happy Greetings for a Friend!


This was another card I had started that was sitting on my desk - and I finally put it all together today. I had some pieces of the Sweet and Sour Designer Paper cut and the card base, but today I added all the details.


I thought this was a cool way to make this border - it's the new Blossom Bouquet Triple Layer punch. I made five of them and then stuck them to the Rose Red layer, overlapping them just a bit. Of course, the centers (that were now halved) needed some bling!!


Then I made the focal piece with the 2 3/8" Scallop Circle, a 2" circle from the Circles #2 Big Shot die (please, oh please, Stampin' Up! get us a 2" circle punch!), and then the 1 3/4" circle for the saying. The saying is from the Happy Greetings set in the Summer Mini. And I added a couple buttons from our Designer Buttons packs!


Thanks for stopping by,


Julie

Friday, May 27, 2011

Flower Garden Meets Woodland Walk!


This is a card I started the other day (while procrastinating other things I was supposed to be doing!). I saw a card on Stampin' Connection where they sponged some color onto a piece of Designer Paper and I really liked it! I'm not sure that my card turned out to be exactly what I imagined, but it's an idea I think I'll work with again!

With the Woodland Walk designer paper, I sponged Crumb Cake onto the vanilla areas of the flowers. So that lead me to use Crumb Cake for the card base. - Like I never would use that color otherwise?! :)


And here's a close up of the Flower Garden embossed background - I gave it a little sponging with Crumb Cake to blend with the sponging on the paper.

I also added the saying from the Happy Greetings set. - Lovin' that sayings set!


Thanks for stopping by,


Julie

Wednesday, May 25, 2011

Fabulous-ly Simple Floret!


Here's a super simple thank you card I made today! I was inspired by a card I saw on Stampin' Connection made by LeAnne Pugliese. It kind of reminded me of the sponging I did on one of the cards I've made just recently, but then it's a bit stepped up with an embossed image in the middle.

So, to make this one, you would just want to stamp and emboss your main image first, then you sponge the background.


Pretty cool, huh?!


Thanks for stopping by,


Julie

Monday, May 23, 2011

Graduation Owl!


I needed a graduation card, and I couldn't resist making one of these little owls! I know I've seen a lot of these little guys made, but I was inspired by a card made by LeeAnn Greff (I've followed her blog for a long time!). You can check out her version here. It's pretty much the same, but I made bigger eyes and I used Pacific Point.


I also gave an extra black layer and popped up some parts for extra dimension. And I used the Black Taffeta ribbon - I love the weight of it, and it's so easy to push and pull into place!


Here's a little bit closer up of the owl - he is pretty cute, huh?! His little diploma is just a piece of 1 1/4" x 1 1/2" typing paper rolled up and tied with the 1/8" Black Taffeta. His wings were made with a Scallop Oval punch, just with the top part of it trimmed off. His graduation cap is hand cut out - but the rounded edge that sits on his head was made with the 1 1/4" circle punch.


And here's the inside, with the saying from the Word Play set. - Perfect for the graduate, don't cha think? And, guess what? - the set is still on sale for 30% off, but only until the end of May! (You can click on the "National Scrapbooking Month" ad to the right for more details.)


Thanks for stopping by,


Julie

Sunday, May 22, 2011

Quick and Elegant Flower Garden


I wanted to make a few thank you cards that I could do real quick to have on hand for mailing out. And this card is about as quick and simple as they come - but I think it still has an elegant feel to it.

I just ran the Very Vanilla through the Big Shot with the new Flower Garden Embossing Folder. I sprayed a little Shimmer on it (I just had to!). Stamped a thank you (from the Thank You Kindly set) in Marina Mist. Then I tied a piece of Satin Marina ribbon around it and layered it onto a Marina Mist card - and wah lah...


Here's a little closer of the embossed Flower Garden with the Shimmer Spray - not sure how well you can see the shimmer in the picture, but it just adds that little bit!

Wouldn't a bunch of these make a nice little gift set for someone?!


Hope you had a great weekend,


Julie


Friday, May 20, 2011

A Rose Flower Fest!


Today I wanted to make a thank you card, and I decided to play along with a couple of Challenges! I've been making a bunch of design and color choices in some remodeling we're doing at home, so it was definitely nice to have some design and color choices already made for me!!


So I went with this cool and fun design layout from the Create with Connie and Mary site!


And then I found this color inspiration from the Stamping 411 site! I forget to take out River Rock, but I really do like it!!


I wasn't sure at first about making all the different flowers (from the new Flower Fest set) all in the same color, but I like how they came out! The (outside of the) largest flower was punched out, and the rest were hand cut out. But they all coordinate with punches if you don't mind a little extra edge to them. - Makes it a great set to keep it quick when you want!

Anyway, I added some sponging (in Rose Red too), a little Rhinestone bling and some Shimmer Spray to glitz then up a bit too!


I added the saying from the Just Believe set - I love how the words from that set fill up the Word Window punch just right! And I added the Chantilly Crochet Trim for the bow. I gave it a little sponging in River Rock to help it coordinate better. I also sponged all the Very Vanilla pieces with River Rock too!


Have a Happy Friday!


Julie

Wednesday, May 18, 2011

A Blushing Floret!


Today I finally got a chance to play along with the Stamping 411 Sketch Challenge. I decided to use the Fabulous Florets set (from the Summer Mini). And I used Blushing Bride, Crumb Cake and Soft Suede.


And here's the sketch!


Here's a closer up of the flower - I stamped it onto Very Vanilla and then yep, I cut it out! Then I popped it up with a couple Dimensionals. And the background Scallop Square comes from the Big Shot die Scallop Squares Duo (also in the Summer Mini!).


And here's a close-up of the saying and the brad accents. The saying comes from the Teeny Tiny Wishes set (man, I've gotten my money's worth out of that set!!). And the brads are from the Subtles collection - really they're Pretty in Pink, but they go great with the Blushing Bride Patterned papers!


Thanks for stopping by,


Julie


Monday, May 16, 2011

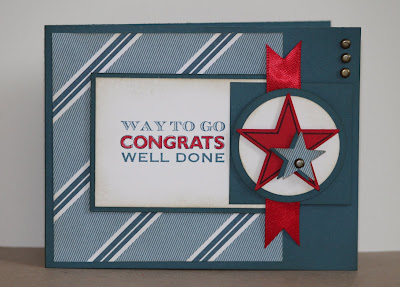
Congrats Alex!


Today I made this card for Alex. I used the Sketch Challenge from Mojo Monday to help me with a layout idea.

Here's the Sketch I tried to follow!


I used a saying from the new Happy Greetings set, and the background paper is from the Nautical Expedition DSP pack.


I also used the Seeing Stars set to make the Not Quite Navy stamped star. The other stars are from the Stars #2 Big Shot die. Don't know if you can see, but I sponged most of the parts with Crumb Cake too - it just toned things down a bit!


Here's a picture of Alex going up to receive his award. He got an academic award for achievement in English. The awards were a surprise to the kids receiving them, but as parents we were told about it on Friday so we could plan to go to the assembly and watch. Right now he has straight A's in all of his classes - I'm so proud of him!

So I made this card for him, but I didn't give it to him at the assembly this morning - I didn't want to embarrass him! Actually I'm not really even sure that he saw that his dad and I were there! I'm going to give it to him after school though.


Hope you had a happy Monday,


Julie

Sunday, May 15, 2011

A little bit of Sweetness!


Here's a quick card I made the other day (inspired by one I saw made by Dawn Griffith). It's just a little 3" x 3" card, but I love it - super easy!! And sometimes all you need is a little note!


I used a small strip of Sweet & Sour Specialty paper layered onto a piece of Rose Red. I also used the "love you" from the Short & Sweet set. - Doubly sweet there!! And then I added a punched flower from the new Triple Layer Blossom Bouquet punch.


And here's a little tip for centering the brad (I used the Circle Fire Rhinestone brad) on these flowers - use your Paper Piercer! I've made a few of these punched flowers before and I've used my 1/16" punch. But with the punch, sometimes it's hard to see that it's really going into the center - so I've found the Paper Piercer easier to "aim" at the center!


Hope you've had a Happy Sunday,


Julie

Saturday, May 14, 2011

A Trio of Treats!


I made these little cone treats for Alex and Jessie (my kids), and Jessie's friend Jessica. We had been going back and forth all week about deciding if we could get together today, and at the last minute the plans all worked out. So late last night this is what I made for them, just for fun! Definitely more of a girly treat, but Alex won't care, he'll just do a "Oh, cool, Mom." - He gets the Chocolate Chip colored one.


This one is for Jessie; her favorite candy is Almond Joy! I made the cones with just a 6" x 6" piece of patterned DSP. I put Sticky Strip down one side of the paper and folded it around and stuck it to it's adjacent side. - They're super quick and easy! All the colors I used for everything was Pear Pizzazz, Peach Parfait, Melon Mambo and Chocolate Chip.


Because we packed at the last minute, I only brought the new set Flower Fest and Bold Blossoms (that's why Alex gets flowers too). So I stamped and sponged each of the images, just using the same colors - you know, stamped the flower in Melon and sponged it in Melon. And I really like this set - It's so fun and easy to use! Almost all the images have coordinating punches, which makes it even better!

If you look at the little peach flowers, they have "leaves" that are really a five petal flower stamped in Pear - I just cut them into groups of two and three. I used it that way to make quicker leaves! But for the leaves sticking out of the top, I did a hand cut-out!


Then I used the saying from the Bold Blossom set - and I added on a Bitty Button with a coordinating Melon Mambo punch behind it. And I used some of the new White Baker's Twine (yay, white twine!!).


I'm glad we got to get away this weekend - and even just as glad that I get to bring some stamping and crafting to do!

Hope you have a great weekend,


Julie


Friday, May 13, 2011

Butterflies Popping up Eveywhere!


I kept seeing these cute little pop-up butterfly cards, so I decided that I needed one too! And boy, is it a little one!! It's made with the Beautiful Butterflies Big Shot Die, and it measures just over 3" wide and about 2 3/4" tall! But it makes for a perfect fit in our Mini Envelopes!

I made mine with the Perfect Plum Cardstock, and I ran it through the Finial Press Embossing folder. Then I Shimmer Sprayed it and gave it a little sponging.


Here's a side view that show how the base of the card is made with a fold-over piece of Perfect Plum (it's placed on the butterfly die just below the top of the butterfly, to keep the fold on top). Then on the top part of the folded butterfly piece, you score across the center.

Then a full large butterfly and a small butterfly were die-cut. Those pieces are run through the Finial Press folder (and Shimmered and sponged). After you stick those together, you stick just the bottom half of the large butterfly to the front bottom half.


And here's the inside! The little saying is from the On the Grow set!


Have a great Friday,


Julie

Thursday, May 12, 2011

Sailing into Thursday!


So this is a card I made for the Create with Connie and Mary Color Challenge 150. It was definitely a challenge when I saw the colors Poppy Parade, Sahara Sand and Not Quite Navy. I've been wanting to use the Poppy Parade, but every time I think to take it out I find something else. I guess it's just not one of those colors I'm drawn to.

But when I put these three colors together, I got a masculine and nautical feel. So I decided to use the Sail Away stamp.


Here's a close-up of the Poppy Parade Poly Stitched Twill. I love this ribbon - it's so nice to work with! It's soft, but makes a nice crisp knot!

And to color-in the Sail and the water, I used the Aquapainter with Sahara Sand ink and Not Quite Navy ink.


And finally, because it was a masculine card, I couldn't add bling, but the antique-brass colored brads added that little something I thought it needed! And I think once this card was all put together, it gave a Ralph Lauren Polo feel!?


Thanks for stopping by,


Julie

Wednesday, May 11, 2011

(The Lost Files of) Simple On the Grow...


Call this crazy... but I went on to my blogger last night to post something and it wasn't working. So, ok. I came back today to find that is working again, but my last two days' posts are gone?!? So, to the best of my memory (haha!), I'm at least going to re-post what I had on here!

This was a card I made, just to make! I used the On the Grow set, and did some watercoloring with the Aquapainter.


And here's a close-up of the flowers after I used Crystal Effects on the jar (it just needed that huh??!), and I used Smooch Pearlized Top Coat on the flowers. I think those added just a little bit of 'coolness' to the card!

Thanks for checking it out!


Julie

Tuesday, May 10, 2011

Thanks with Pretty Postage!


I made a few of these little Thank You Matchbooks tonight. I needed something simple so I could duplicate them, and the Matchbook is always a quickie! You just have to decide how big to make it depending on what you'll put inside.

So I decided to use the Nursery Suite papers. I have a lot pieces of left from baby shower stuff I made, but I really like the patterns for lots of everyday things - and I think they're super cute and springy/summery!


Then I decided to use the thanks, thanks, thanks from the Pretty Postage set - so easy to use! And it made sense to use the colors that were in the Nursery Suite Papers. And, yep, that's the new Postage Stamp Punch (in Espresso Cardstock)!

- Of course, it needed a little something more, so why not a bitty button?! They're so fun for a little extra somethin' - and easy to match with just a snip of coordinating cardstock punched underneath.


Here's the treat inside - all healthy of course, granola (grains) and dark chocolate ('healthy' chocolate).


Well, off to make some more...


Thanks for stopping by,


Julie


Monday, May 9, 2011

Swirlin' with Butterflies! and a punch tutorial


I really wanted to just get in my craft room and make a card today!! So I finally did later this evening. I didn't have anything in mind to make until I found this sketch challenge from Stamping 411.


This is the sketch that I followed - just that I followed it kind of loosely I guess!


I ended up doing a lot more "Big Shotting" than stamping, but it was pretty fun to make! I actually had the Elegant Lines embossed piece of Crumb Cake (already Shimmer Sprayed). Then I was going to put some flowers on it, but decided to make Butterflies instead. I used the Beautiful Butterflies die and the Beautiful Wings Embosslit with Pumpkin Pie and Peach Parfait to make all the butterflies.

Then since the butterflies needed a little something behind them, I decided to use the Swirls Scribbles Sizzix die in Espresso to add some fun!


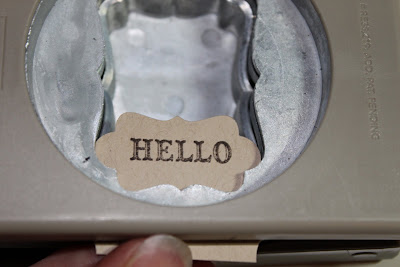
And here's the tag I made with the Happy Greetings set. The stamp really has three HELLO's on it, but I just used the one. Here's how I punched it:


First I stamped just the one HELLO on a scratch piece. Then I put it in so that the end lined up to make the top edge.


Then I put that punched piece back into the other side of the punch and lined it up and punched again.


This is kind of a cool look here, but I didn't really want the little knobby things on the ends for this card. (We actually made this in stamp class not too long ago - remember the Decorative Label Punch "mini me" and "skinny me" - this was the mini me! - And if you turn the saying to the longer edges of the punch, that's the skinny me! - And, yep, I made up those cool names for them :) )

Oh... back to the tutorial!...


So for this card, I decided to clip the knobby ends. Then I sponged it (along with just about everything else on the card!).


Then here it is on the card again!


Thanks for stopping by,


Julie