Sunday, April 5, 2020

Creation Station Blog Hop! It's What's on the Inside that Counts!


Welcome to Just Julie B Stampin! This month's theme is 'It's What's on the Inside that Counts' - I Love this idea!! So often we spend so much time creating a beautiful card front and then leave the inside blank. But this time, the focus is on the inside of the card! 

So I had a request to make a birthday card with purple and teal, and it was right about the time when I was thinking about what to make for this month's design - so I combined them into this card! 


I used a retired stamp set, Balloon Celebration, for the front. We do have a current stamp set with balloons in it, but I always liked the style of these ones, so I had to use it! But I first stamped the Happy Birthday (from Perennial Birthday) across the middle-ish to start. Then I just stamped those balloons in Gorgeous Grape all over the top part and in Bermuda Bay on the bottom part, some of each are stamped-off ink. 


And then for the inside 'WOW' - all I did was add a 3/4" white strip of cardstock (that hopefully just made it fade into the background of the card base), that was folded in half and then again in half again, to make quarters. I only glued down the two ends and left the middle sections folded out to create a section to pop-out.

Then I punched a bunch of balloons from Gorgeous Grape, Highland Heather, Bermuda Bay and Coastal Cabana using the Balloon Bouquet punch. I glued them randomly onto the 3/4" strip.


And to highlight one balloon (and kind of balance out the left side of the inside of the card) - I added a Black Twine string and bow.


And on the right side I added the inside greeting - and I Love the font and greeting from the Perennial Birthday stamp set!


Here's just another view, from the top, of the balloons to see how much they pop out!

I hope you enjoyed your stop here - and you have to check out what's next! I can't wait to see what the fabulous Sara has in store for us! 


Thanks for stopping by,


Julie B

Sunday, March 1, 2020

Creation Station Blog Hop - Make it Interactive!


I'm so excited to be back this month with a fun theme! The Creation Station Design Team is going interactive! We're making cards that shake, flip, spin... How fun is that, right?!

As soon as I heard the theme, I couldn't wait to make of one of my favorite interactive cards - most call it a Twist and Pop Card!


When you see the card front you would think it's just a typical card (but you'll see that it's what's inside that counts...).

I decided to use the Birthday Bonanza Suite of products. I love the little animals in this suite, especially the sweet little koala. And a little secret - the ones on this card are all cut outs from the designer series papers!


And the Assorted Pompoms that are included in this suite - too sweet too!

And here's the WOW! When you open the card, this four panel section twists and pops out from the card! So, so fun and addicting to keep opening and closing the card!!


The little koala cut-outs and the sweet saying from the Bonanza Buddies stamp set fill the panels.


And there's this space at the bottom to write and sign the card! If you're looking for a tutorial on this type of card, you can google Twist and Pop Card.

I hope you enjoyed your stop here, and can't wait to see what the amazing Kerstin has created this month.


See you soon,


Julie B

Sunday, January 5, 2020

Creation Station - Resolution Solution!


Welcome to Just Julie B Stampin'! This month our theme is Resolution Solution - and my take on that was to create this Mini Desktop Calendar. For some it's probably 'old school' to have a paper calendar - 'Why would you need one with phones and ipads and laptops?' But I'm all about the paper stuff, so of course I need a calendar on my desk!

And those that come to my stamp classes each month, for many years now, know that we will make a calendar project. We usually make it the beginning of January - but this year I was organized enough that we made them in our December class. So we were ready to start the year with it already out! - Talk about Resolution Solution, huh?!


I went back to a super simple design that we had made in a past year's project. It's a simple 4 1/4" x 11" Pool Party Cardstock piece folded in half. Then I scored a 4 1/4" x 5" Pool Party Cardstock piece at 1 1/4", 2 1/2" and 3 3/4". Then I glued that to the inside open edges of the bottom. - So no slipping or falling flat for the calendar!

And this top picture is the design I originally made for my classes.

But after showing the attendees how to put it all together, one of my creative ladies decided to use the scrap that I had thrown away. And she added it on the bottom of her project. Like this ~


So pretty! And a little more finished, right?! I loved her 'one up!' on the project! - Thanks again, Francine! And I love when my stampin' friends come up with an idea or something cool to share with us - we all learn from each other!

Can't wait to see what the fabulous Elizabeth Price has in store for us - she always has so many cool things I can learn from!


I hope you enjoyed your stop here today!

Happy New Year,


Julie B


Sunday, December 1, 2019

Creation Station - Put a Ring on It!


Welcome to Just Julie B Stampin'! This month at the Creation Station we're putting a ring on it!! So for my take on this, I decided to put a ring, or belly band, around one of our super shiny and beautiful Gold Mini Pizza Boxes. Then I did a faux belly band on the coordinating card!

And I used a little bit of a mix of products to get a different, more subtle Christmassy look!


The card is Mossy Meadow based, with the music sheet papers from the Pressed Petals Specialty Designer Series Papers pack. I also used the lighter Merry Merlot printed piece as a back drop for the Christmas tree. 


The Gold Mini Pizza Box was actually the start of the creation! It was an easy thought to add a 2" x 10" strip (or 'ring') of DSP around the box, and then go from there!

And I love the realistic look of the trees from the Perfectly Plaid stamp set. So beautiful, and even better when you can punch them out! Easy peasy! And a few Holiday Rhinestones are a perfect addition to make them more Christmassy!

If you weren't sure about the tree topper, I trimmed the edge from the Gold Metallic Edge Ribbon and tied that into a small bow. Then I added it with a rolled up Glue Dot!


I hope you enjoyed your stop here! And next up on the hop is my talented, awesome friend, Elizabeth Price! I can't wait to see what she has in store for us!!


Thanks for stopping by,


Julie B

Sunday, October 6, 2019

Creation Station - Black and White Plus One!


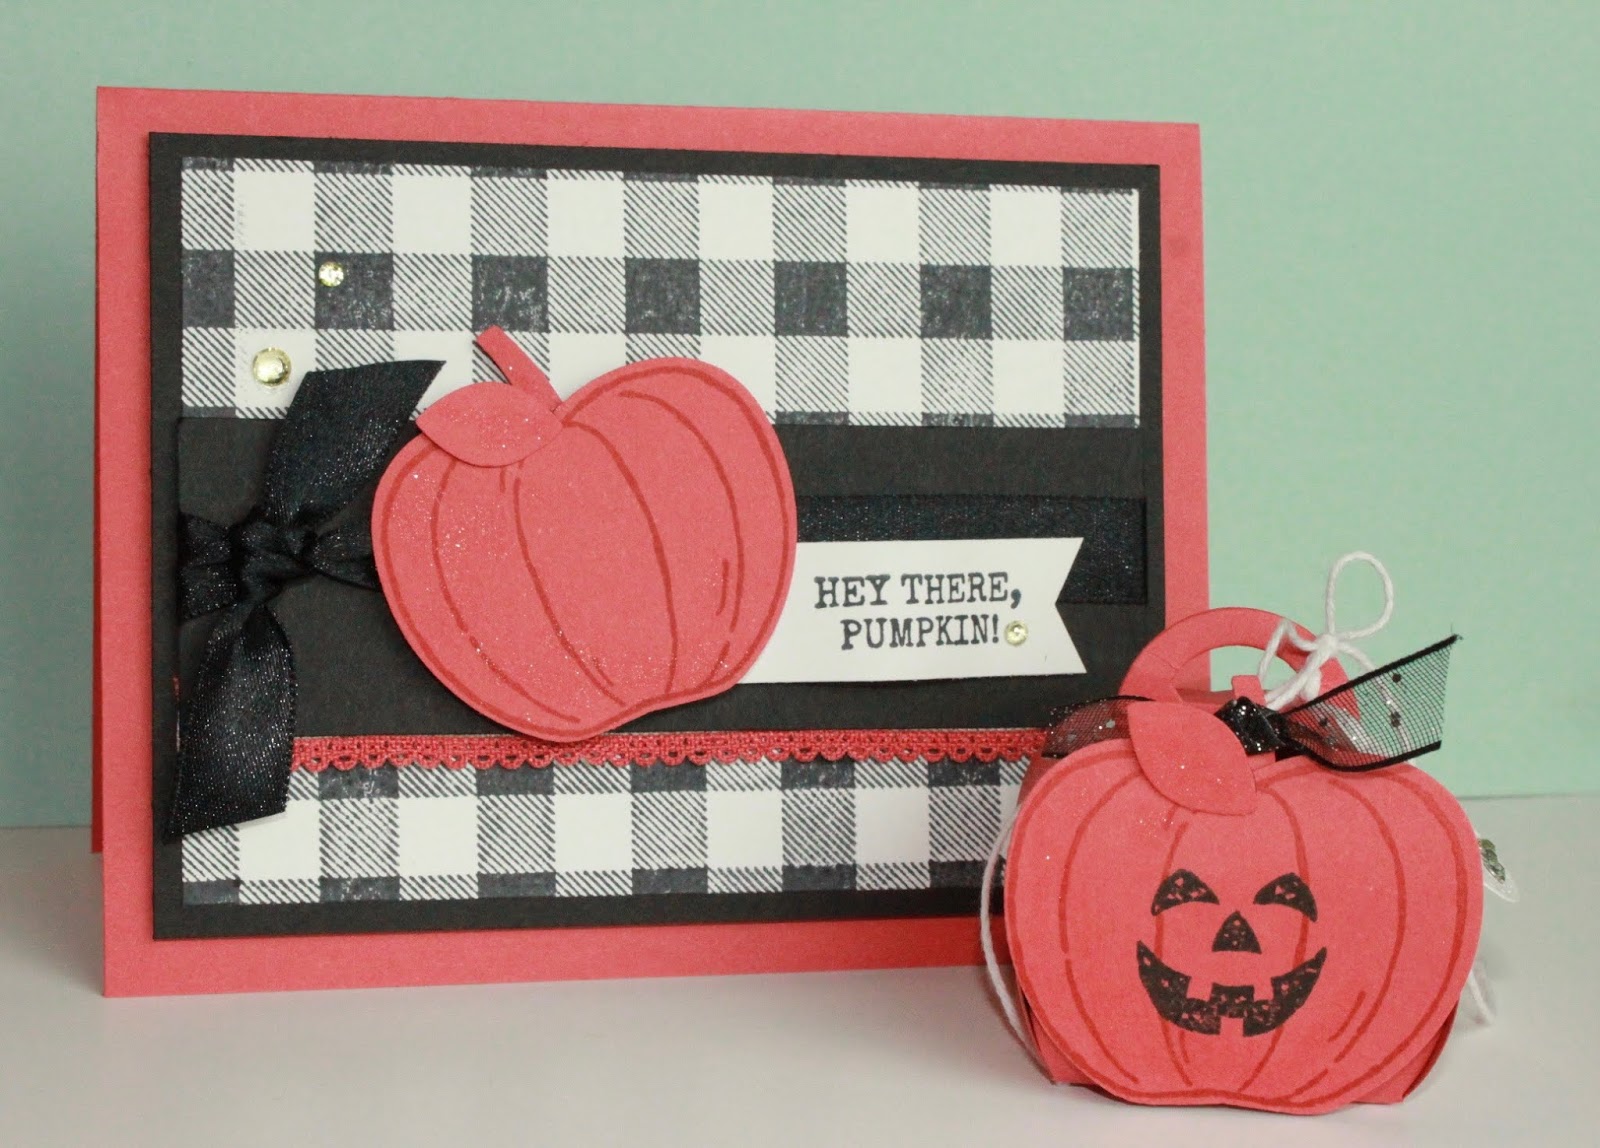
Welcome to Just Julie B Stampin'! If you're hopping here from Sara Nell Langland's blog, I hope you enjoyed your stop there. And if you're just starting here - Welcome! This month we are stamping Black and White, plus one more color. And my color is Terracotta Tile! It wasn't my favorite color when I first saw it, but it surely has grown on me! And now with the Fall season here - I Love it!! And it's the perfect pumpkin color for Fall. And I knew I wanted to make a Fall card and little treat.


For the black and white, I was first drawn to look for a Designer Series Paper (DSP) to start this card challenge. I'm not a super fan of stamping a background stamp, but I Love the Buffalo Check pattern - so it was my first choice when there wasn't a black and white DSP. So that was the base of my card - and the Harvest Hellos pumpkin became the focal point after that. And the other coordinating pieces fell in line!


I added some Wink of Stella to the pumpkin to give it a little something more! More colors don't necessarily need to be added - sometimes just a little sparkle!


And for the little coordinating treat, I made a quick and easy Mini Curvy Keepsake Treat Box - these are so cute, easy and addicting to make!! I added a punched pumpkin, with the super cute jack o' lantern face, to the front of the simple Terracotta Tile die cut treat holder.


And then there's this little tag I added to the side - but only in black and white, to keep with the theme! Super simple, with a little Rhinestone bling!


I hope you enjoyed your stop here! And I can't wait to see what's next on the hop, over with Kathy Kartak! Click below to check out her creation! 


Thanks for stopping by,

Julie B

Sunday, September 1, 2019

Creation Station Hop - His and Hers!


Welcome to Just Julie B Stampin! and to Creation Station's blog hop for the month of September! This month we're stamping 'his and hers'! So, to me that meant making the same (or very similar) card that has a 'his' version and a 'hers' version. I recently bought the Everything Amazing Stamp Set, and I decided to use it for my 'his and hers' cards! I just love the huge 'Amazing' that takes up almost half of the card - a great sentiment to build upon!


They are pretty much the same card. I just flipped the layout and used different colors.


For the 'his' card I used Pretty Peacock, Bermuda Bay and Sahara Sand - masculine, but still so fun!


Initially I used the balloon stamp that is in the set, but then I changed it to the solid balloons from the Balloon Bouquet punch - I love the pop of big color in them!


And I just carried the same colors through on all the stamping! 


And for 'hers' I went a little out of my comfort zone and looked at an old Color Coach for a color palette. I used Blackberry Bliss, Melon Mambo and Smoky Slate - nothing I would have chosen myself - but so fun!


I Love how the two solid balloons tie the colors back together for the whole card!


And everything in Melon Mambo just pops!! 

I hope you've enjoyed your stop here today. I can't wait to see what the fabulous Elizabeth Price has in store for us next! Click below to go check it out! 


Thanks for stopping by,


Julie B

Sunday, August 4, 2019

Creation Station - Stampers Gone Wild!!


Welcome to Just Julie B Stampin'! If you're just starting here - glad to have you! And if you're hopping here from Jennifer Downey's blog - happy that you've continued on the hop! This month we're Stampers Gone Wild!! We'll be stamping cards and projects with an animal set or wildlife. So I recently bought the stamp set Wildly Happy, and I couldn't wait to use it! 


I love these soft little bunnies! And all the stamps in this set are a cute adult/baby couple. I just love them! I used Light Crumb Cake Stampin' Blends to color the bunnies here, with a touch of Flirty Flamingo on the ears and nose.


I added the Subtles Folder for some texture of the Blushing Bride Cardstock for the background piece. Plus, I used the coordinating color of DSP in the gingham pattern (love that one!) on top of the Cardstock.


I used threads of the White Linen Flax to tie the little bow that is Glue Dotted onto the saying! I love using those threads that way! And the final touch are the Melon Mambo Rhinestones from the Noble Peacock Rhinestone pack (those colored rhinestones really are versatile in blending with many similar colors).

I hope you enjoyed your stop by today!


And I hope you continue the hop to see what fabulous creation Denita Wright-Smee has in store for us! Click on the link below to get there!


Thanks for stopping by,


Julie B


Sunday, July 7, 2019

Creation Station Hop - Got Your Back!


Welcome to Just Julie B Stampin'! This month we are designing hand created backgrounds. I couldn't wait to play with the Wiggle Worm Bundle - the little critters are all so cute and the dies are awesome too!


For the hand created background I decided to die cut a bunch of the leaves from the Call Me Clover Cardstock and adhere them to Call Me Clover Cardstock piece. It's subtle, but very specific look I was going for!


Then I created a tiny scene on Stitched Square with the cute little worm. Not that I like real worms, but this one sure is a cute little one! And all the little pieces around him are from the same bundle of stamps and dies - all fun details!


I can't wait to see what the fabulous Andrea Tracy-Tucker has created for us...


I hope you enjoyed your stop by here,


Julie B

Sunday, June 2, 2019

Creation Station - Unique Folds Blog Hop!


Welcome to Just Julie B Stampin'! This month our Creation Station group is creating Unique Folds! And I'm super excited about this Hop! I Love, Love, Love a cool and different fold. I've been trying to incorporate fun folds in my classes for quite a few months now because they just have that WoW factor!! And I think everyone is excited when they open a card that has the WoW!

So the card I created today is simple, but still has that unique fold on the inside! I needed a couple graduation cards - and the new set, Above the Clouds was a perfect choice!

So for the card front I used a Whisper White Stitched Circle with some 'background' clouds in Pool Party ink. And then I stamped a Hot Air Balloon with the new Pretty Peacock ink, and punched it out with the new Hot Air Balloon punch. The Hot Air Balloon basket is stamped with Soft Suede onto Crumb Cake cardstock, and punched with the same punch.


And I love the saying, 'You're off to great places!' - especially for a graduation card! And it fit just perfectly into the Classic Label Punch! A bit of Crumb Cake Twine with Crumb Cake Cardstock was the perfect in between of the Pretty Peacock Designer Series Paper to tie it together.


And then for the Fun Fold inside - Like I said, it's a simple fold, but just perfect for a gift card or stash of cash! 

The Whisper White piece started as a 4" x 11". It was scored at 5 1/4", 6 1/4" and 7 1/4" to create the middle section. I used a little Tear and Tape to adhere the center and then punched with the same Classic Label Punch to create the money holder! - A super easy Fun Fold card center, and super functional!!


Here's a little closer look at the little pocket for the inside - so cool, huh?!


And, if you've stayed with me through the whole post - I have a question for you! How much do you think is an appropriate amount of money for a high school graduate? $50, $100?? Just curious what others would send!

I can't wait to see what kinds of other unique folds are in store for us on the rest of the hop!

Click here to check out what the fabulous Elizabeth Price has for us ~


Thanks for stopping by,


Julie B