Tuesday, May 10, 2011

Thanks with Pretty Postage!


I made a few of these little Thank You Matchbooks tonight. I needed something simple so I could duplicate them, and the Matchbook is always a quickie! You just have to decide how big to make it depending on what you'll put inside.

So I decided to use the Nursery Suite papers. I have a lot pieces of left from baby shower stuff I made, but I really like the patterns for lots of everyday things - and I think they're super cute and springy/summery!


Then I decided to use the thanks, thanks, thanks from the Pretty Postage set - so easy to use! And it made sense to use the colors that were in the Nursery Suite Papers. And, yep, that's the new Postage Stamp Punch (in Espresso Cardstock)!

- Of course, it needed a little something more, so why not a bitty button?! They're so fun for a little extra somethin' - and easy to match with just a snip of coordinating cardstock punched underneath.


Here's the treat inside - all healthy of course, granola (grains) and dark chocolate ('healthy' chocolate).


Well, off to make some more...


Thanks for stopping by,


Julie


Monday, May 9, 2011

Swirlin' with Butterflies! and a punch tutorial


I really wanted to just get in my craft room and make a card today!! So I finally did later this evening. I didn't have anything in mind to make until I found this sketch challenge from Stamping 411.


This is the sketch that I followed - just that I followed it kind of loosely I guess!


I ended up doing a lot more "Big Shotting" than stamping, but it was pretty fun to make! I actually had the Elegant Lines embossed piece of Crumb Cake (already Shimmer Sprayed). Then I was going to put some flowers on it, but decided to make Butterflies instead. I used the Beautiful Butterflies die and the Beautiful Wings Embosslit with Pumpkin Pie and Peach Parfait to make all the butterflies.

Then since the butterflies needed a little something behind them, I decided to use the Swirls Scribbles Sizzix die in Espresso to add some fun!


And here's the tag I made with the Happy Greetings set. The stamp really has three HELLO's on it, but I just used the one. Here's how I punched it:


First I stamped just the one HELLO on a scratch piece. Then I put it in so that the end lined up to make the top edge.


Then I put that punched piece back into the other side of the punch and lined it up and punched again.


This is kind of a cool look here, but I didn't really want the little knobby things on the ends for this card. (We actually made this in stamp class not too long ago - remember the Decorative Label Punch "mini me" and "skinny me" - this was the mini me! - And if you turn the saying to the longer edges of the punch, that's the skinny me! - And, yep, I made up those cool names for them :) )

Oh... back to the tutorial!...


So for this card, I decided to clip the knobby ends. Then I sponged it (along with just about everything else on the card!).


Then here it is on the card again!


Thanks for stopping by,


Julie


Sunday, May 8, 2011

Happy Mother's Day!


Happy Mother's Day to all the moms today! Don't us all women mom everyone?! I think mom can be a verb right?

So here's the card I made for my mom (Don't look yet, Mom!). She's coming over today and we're having a little BBQ and get together with family. I wish the weather was going to be a little nicer for us to be outside, but oh well, just looking forward to a nice together!


For the card I used the Fabulous Florets in Perfect Plum (inked in Eggplant Envy) and Marina Mist (inked in Pacific Point), and the leaves in Old Olive (inked in Always Artichoke). Lots of hand cut outs, but worth it - I like 'em that way!

The Circle and Scallop Circle were done with the 3" Circle die and the Scallop Circles #2 die for the Big Shot.

The outside saying (from the Full of Life set) could have probably been a good inside saying, but I liked it outside - I wanted that to be the bigger message of the card!


And I even sorta did up the inside! Hope you have a great Mother's Day!


Thanks for stopping by,


Julie

Saturday, May 7, 2011

Faux Paint Chip Strip


Today was going to be a stamping day - a fun, nothing-else-priority kind of stamping day! And then... where did the time go?? Not only did I not get any stamping done, I didn't get much of anything else done either!!

So anyway, I decided to show you one more card that we made in class yesterday. I was inspired by Leann Greff, who used strips of cardstock and stamped a detailed image over them. But she used three different colors of cardstock. So when I saw hers, I thought I could put varying shades of one color and make it look like a paint chip strip. You know, like the ones people use from Lowes or Home Depot.

So I put together four 1 1/4" x 3" strips in Pink Pirouette, Pretty in Pink, Regal Rose and Melon Mambo to create a pink paint chip strip! Then we layered it on black and stamped it with the Fabulous Florets stamps.

It was fun to stamp outline images and not have to color them in!

I think this card gave a Hawaii kind of vibe, what do ya think?


Julie

Friday, May 6, 2011

Hope & Strength - Thanks Nancy!


This was one of the Strength & Hope cards I got from the Summer Mini swap I'm in, made by my swappin' buddy Nancy Ferb! This morning I had stamp class and one of the ladies asked if I could post it so she would have a way to be able to see a picture of it later. - So here ya go, Laurel!!

I love my first Friday classes! It's always nice to get together and catch up with friends! I really do look forward to seeing everyone, chatting, and creating stuff. It's such a cool realization to think about how something as fun as stamping and crafting has brought so many of us together as good friends - love it!!


Happy Friday,


Julie


Thursday, May 5, 2011

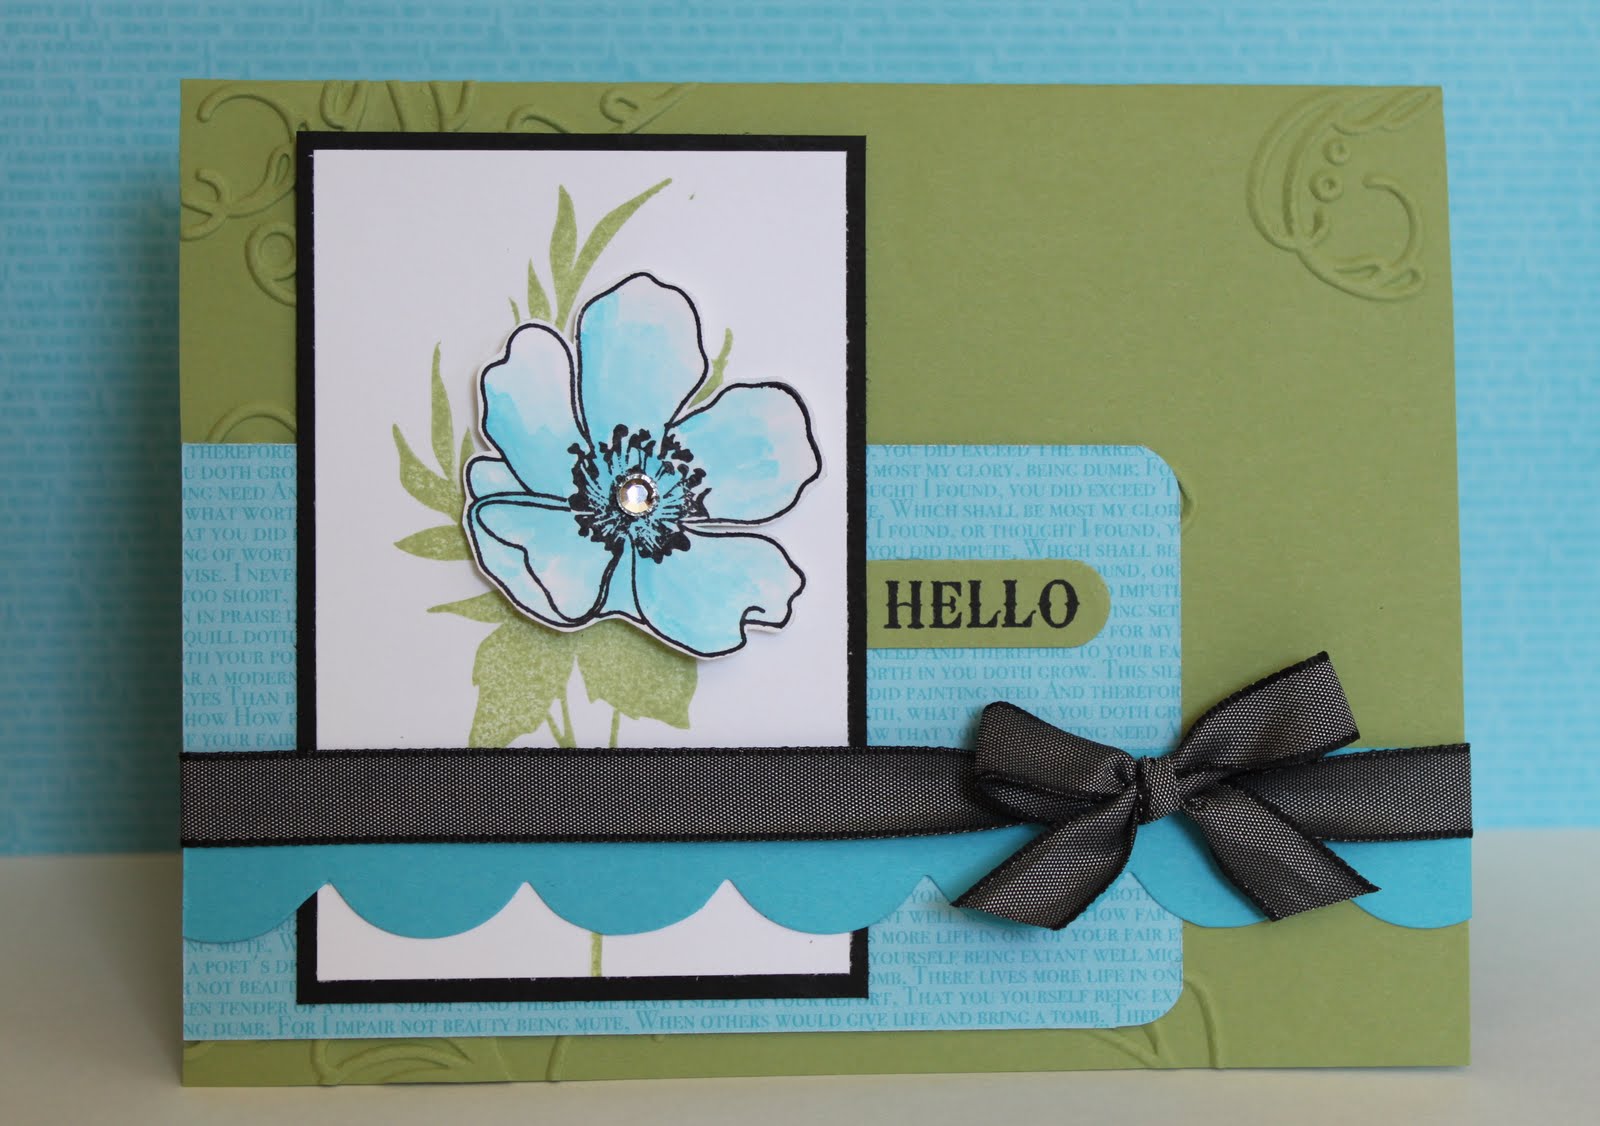
Lovin' this Sketch and Colors!


When I first started using Stampin' Up! stuff, I was in love with Tempting Turquoise! And then as the colors collections have evolved, I sorta found my new favorites (Baja Breeze :) Yes!). So I haven't really used Tempting Turquoise as much anymore. But when I saw the Color Inspiration at Stamping 411 today - I knew I had to jump back in with one of my old favorites!!


Aren't these colors just refreshing and summer-like?! Love 'em!


Then I went over to Connie and Mary's and found this super-fresh looking new Sketch Challenge. I love a good Sketch! Life's good with a good Sketch!


So then I decided to use the new Fabulous Florets set - it is FABULOUS, huh?! Well, I really like it! I like that the set has some outline images and some solid images too!


And I used one of the new sayings from the new word set Happy Greetings. The hello actually comes from a stamp that has three hellos on it, but I just chopped it for the one I wanted :) And I don't know about you, but whenever there's a new word set - I gotta get it!! You always need new words! And this one has some other awesome ones too.


Well, I was supposed to be doing a million other things, so I better run. But I'm glad I started my day with this card - too fun!


Thanks for stopping by,


Julie

Wednesday, May 4, 2011

Strength & Hope and Some Inspiration...


I made this card for Technique Class this Friday! I was inspired by a card I saw by Lisa Young (she's an amazing stamper!). I've had the card in my favorites for a while, and I decided that it was a great one to transform into a card for class!! Her card had a chair as the stamped focal piece, but I really love this new butterfly from the Strength and Hope set (and it was good timing for a SUO Challenge - In Celebration of Butterflies!), so here it is!!


The layout was really appealing to me, and probably what drew me to the card initially (or maybe it was the Crumb Cake!). But anyway, I really like how the little enjoy life little ovals anchor that side of the card, and then draw your eye down to the butterfly!


And, yep, I did cut out the butterfly. But did you notice the little trick to not have to cut out the antennae? I'll show it better in class (if you're coming), but the butterfly is stamped onto white (to be cut out), and also onto Crumb Cake (and punched out with the 1 3/4" circle) so that the antennae can be lined up with the cut-out!

Oh, and one of the big reasons I wanted to do this card for class was to show the Awesome Presto Patterns DSP!! Love them - they can be sponged to go with ANYthing!! Yess!!


I hope to be seeing you at class this Friday,


Julie

Tuesday, May 3, 2011

"No Tails" Bow Tutorial


On the card I made yesterday, I made one of these what I call "No Tails" Bow. I've made them for forever I think. But I thought I'd post a picture tutorial to show you how to do it too! So this top picture is what it looks like when you're done!


Step 1 - Punch two holes next to each other. Keep in mind that the space you leave between the holes creates the center of your bow.


Step 2 - Take a piece of ribbon about 12" long (length will vary on different sizes of cards), Feed ribbon through each hole so that both tails are hanging out the back.


Step 3a - Cross the ribbon and with one tail, fold up a bow and push that back through the opposite hole.


Step 3b - This is what the bow should look like once it's pushed through to the front. The tail should still be hanging out the back. And you can pull the tail to adjust the bow size.


Step 4a - Now do the same thing to make the other half of the bow through the other hole.

Step 4b - You should have a bow on the front!


Step 4c - You should also still see the tails hanging out the back. And it's a good time to adjust the bow size if you need to (just pull the tails!).


Step 5a - Now with the tails in back cross them over one last time (and hopefully without too many lumps), and feed the tails back through the opposite holes to the front.


Step 5b - Here's what the front will look like - you kind of need to squish all the bow toward the center to make room on the edge of the hole to feed the tail back through.


Step 6 - Once the tails are pushed through to the front, you'll get some lumps in the back (when you've done a few, they'll get better, and flatter!).


Step 7 - Now that the tails are out in front again, you can just stick them around onto the back...


... so there are No Tails!!


Hope this helps! Have fun making bows with no tails,


Julie

Monday, May 2, 2011

Blushing Butterflies!


I made this card tonight to send to a friend. I was inspired by a card I saw by Mary Brown here. I just changed up the colors, and made it into a standard size card (I think a little taller than hers?).


Here's a close-up of the butterflies. They're from the new Strength and Hope set (when you purchase the set, Stampin' Up! donates $2 toward Breast Cancer Research - pretty cool). I love this set - it really is beautiful! You can see more about the set by clicking on the icon on the sidebar ad.

I stamped the butterflies in Blushing Bride, then I sponged some Crumb Cake and a little Soft Suede on them. I also added some pearls for their bodies - and, yep, I even cut them out, with scissors! :)

And the saying came from the Three Little Words set.


I made a "no tails" bow (see my picture tutorial here) so hopefully it will mail a little flatter (ya, hmmm?!). Anyway, I kind of like the look of that kind of bow no matter how flat it goes! And I added a few more pearls in the top corner to balance things out.


Thanks for stopping by,


Julie

Sunday, May 1, 2011

Big Wish for a Good Buddy!


I made this card for a good buddy of mine that's having a birthday this week! I've been waiting to make an Inset Embossed card with lots of circle punches - so here it is! I've seen a few different versions of these around blogland, but this is my version. I decided to use Marina Mist, Rich Razzleberry, Pear Pizzazz and Crumb Cake.


And here's the "Wish Big" from the Word Play set (which by the way is one of the sale sets this month! You can click on the link on the right side bar to see what else is on sale). I punched it out with the 1 3/4" circle, and added a little Rhinestone bling!


And I added a few more Rhinestones above the Razzleberry Satin ribbon to kind of balance out that side of the card.

Oh, and the base of the card has lots of circle punches stuck on, and then run through the Big Shot with the Square Lattice folder.


Thanks for stopping by,


Julie