Showing posts with label Sale-A-Bration. Show all posts

Sunday, January 2, 2022

Creation Station Blog Hop - Happy New to You!

Welcome to Just Julie B Stampin'! And Happy New Year!! I'm so excited for a New Year; and I'm especially excited for New Stampin' Up! products! Our new January-June Mini Catalog and the Sale-A-Bration Catalog are both just fabulous - I can't wait to get my hands on all of it!!

I have gotten my hands on 'some' things though through the demonstrator preorder... I did a little sneak peek last month with my calendar project and the Friendly Hello Designer Series Papers. And again this month, I decided to show more papers from the Friendly Hello Designer Series Papers, but also, I used some stamps from the coordinating Friendly Hello Stamp Set. - It's an awesome bundle that you can get for FREE with a $100 purchase.

I found a super fun idea from another demonstrator, Robin Armbrecht, called Quadrilateral Cards. So I'm a bit of a math geek person - I love math stuff. Patterns, shapes... I even get excited when things split up in an even amount when prepping for classes... I just love math stuff! - So this fit my bill! ;)


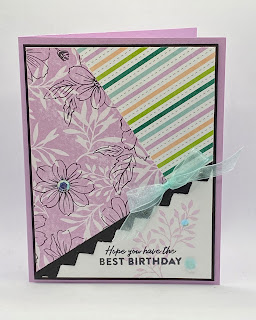
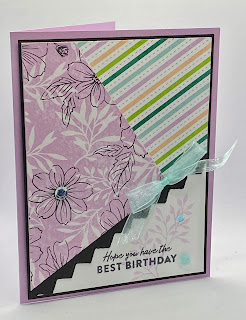
Here's the finished card! Doesn't it look geometrically cool and crazy?! I did use the new Friendly Hello Designer Series Papers - and I love the striped pattern piece just as much as the pretty Fresh Freesia floral print on this! And the floral print piece is the one that starts the layout. It's much easier than it looks.


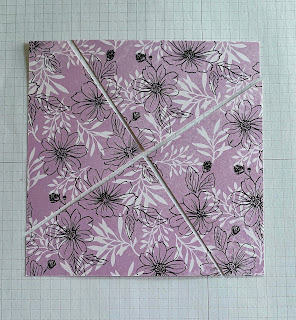
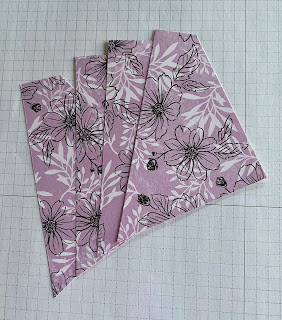
I Love that it starts with a 6" x 6" piece of Designer Series Paper (it's best to use a piece that doesn't have any directionality to it, like a random pattern). Then you make a pencil mark at the 1" mark on the top left corner. you turn the paper and do that on every corner. Then you cut straight lines between those marks to create the 4 quadrilateral pieces. 


And miraculously (like math patterns are!), you'll have 4 equally perfect pieces to fit onto your card front piece!

So these are glued to the left side of a white card front piece. Then a 3" x 4" coordinating piece is glued 'flush' next to it, and then trimmed along the edges.

I added a fun border edge along the bottom with the Basic Border Dies. - Love the zig zag one! And did some coordinating stamping along the bottom before adding the other layers.

And, as always, every card needs some ribbon and embellishments to finish it off! I decided Pool Party ribbon and Artistry Blooms Sequins (one of my favorite things!) just added that last needed touch!!

I hope you enjoyed your stop here. And I can't wait to see what the awesome Kathy Kartak has in store for us next...   


Thanks for stopping by,


Julie B

Thursday, March 20, 2014

Good as Gold Card Set

This set of cards and presentation box are made using the note cards and embellishments from the Good as Gold Card Kit from the Sale-A-Bration catalog.  You will be able to cut the note cards up to create the designer series paper for the cards and box.  The Happy Watercolor stamp set works really well as the focal point for the cards.  The presentation box is created using the Envelope Punch Board.  You will have five cards and most of the embellishments from the Good as Gold Card Kit leftover for more creations, or you could make two sets and give one away!
 
This pretty set was made by Kris McIntosh, and you can get her tutorial when you subscribe to March over at Craft Project Central

Thanks for stopping by,


Julie B

Monday, February 10, 2014

Sweet Sorbet Note Card Set & Box

This cute note card set would make a great gift idea for a friend or perhaps a teacher or co-worker.  This project would also be great for a Stampin’ Up! Sale-A-Bration kick off class, showcasing some of the fun Sweet Sorbet Designer Series Paper and accessories.

This pretty little set was made by Breelin Renwick, and you can get her tutorial when you subscribe to the month of February over at Craft Project Central

Thanks for stopping by,


Julie B

Sunday, March 3, 2013

The Chalkboard Bandwagon!


Here's a card we made at last Friday's class. I decided that it was about time we jump on the Chalkboard Technique bandwagon too! It's such a cool and easy technique! If you have a Whisper White Craft pad, a Stampin' Sponge, a white Watercolor pencil and a piece of Basic Black card stock - That's all you need!

So we went pretty mellow, with just the one stamp from Vintage Verses - just to get the idea. But I really like how people are stamping lots of images all over, kind of a collage of images! Hummm, maybe I'll have to go create something else...

Thanks for stopping by,


Julie B
 

Wednesday, February 20, 2013

Super Simple and Bloomin' Marvelous Again!


I made this quick card to send out for a birthday. I saw a similar card on Pinterest, I think. It goes back to the basics of stamping, but I love it! Just inkin' up the rubber and stamping randomly - so simple!!
 

And, once again, I used the Bloomin' Marvelous stamp set - FREE for just one more month as a Sale-A-Bration benefit! And I inked it up with Calypso Coral, Lucky Limeade and Early Espresso.

Thanks for stopping by,


Julie B
Thursday, January 24, 2013

Use What You Got!


The other day I got another Sale-A-Bration set, Feeling Sentimental, and I couldn't wait to use it! So the set had been sitting on my craft table, and I decided to just use whatever stuff I had on my table to create my card. I had been working on a project with the Tea for Two DSP so that's what I used! So maybe you can call me lazy, but I think it was sort of resourceful using up all my scrap pieces!

By the way, I wasn't going to get this Feeling Sentimental set, but - Wow! It's an awesome set for masculine and vintage cards! I caved, but glad I did! And heck, it was FREE!!  

Have you made your Sale-A-Bration wish list yet?! 


Julie B